Sunday, October 18, 2020

Audio Output on Teensy 4.x Boards

I remember learning about Teensy for the first time several years ago from a colleague. He was using Google WALT device for measuring audio latency, and WALT is based on Teensy-LC board. Back then, this board had impressed me with its tiny size, albeit providing a lot of features. Its processing power is very modest though—Teensy-LC is based ARM Cortex-M0+ processor running at 48 MHz.

Recently I've started a project of a talking ABC board for my daughter and decided to check what progress had Teensy made. I was very impressed learning that the latest (4th) version of Teensy emplys a much beefier ARM Cortex-M7 processor running at 600 MHz! This board is more powerful than the desktop computer I was using 25 years ago, and that's at a fraction of the cost of that PC, and on the footprint of a USB memory stick.

Note that Teensy is a microcontroller board which means it doesn't have an operating system. This is what makes Teensy different from Raspberry Pi, for example. This fact has a lot of advantages: first, Teensy boots instantly, second, all the processing power of its CPU is available to your own app. This also means that the board can't be used for general PC tasks like checking Facebook. However, Teensy can be used for more exciting things like building your own interactive toy.

In my case I needed Teensy to play an audio clip (pronounciation of a letter) in response to pressing of a button. Sounds easy, right? However, one thing I needed to do is to figure out how to play audio on Teensy. What I've learned is that Teensy 4.x offers a lot of ways to do that. In this post I'm comparing various ways of making sound on Teensy.

Teensy 4.0 vs 4.1

Every Teensy generation comes in two flavors: small and slightly bigger. Below is the photo of Teensy 4.1 (top) and 4.0 (bottom):

Both boards use the same processor which means their basic capabilities are the same. However, bigger size means more I/O pins available. Also, it's possible to add more memory to Teensy 4.1 by soldering additional chips on its back side. For my project, the important difference is that Teensy 4.1 has an SD card slot, whereas 4.0 only provides pins for it. I plan to use the SD card for storing sound samples–the board's flash memory is unfortunately too small for them. Storing samples on an SD card also simplifies their deployment as I can simply write them down from a PC.

The audio capabilities of 4.0 and 4.1 are thus the same, so I will be referring to the board simply as "Teensy 4" or "4.x".

Teensy Audio Library

From the programming side Teensy is compatible with the Arduino family of microcontrollers. The same Arduino IDE is used for compiling the code, and the same I/O and processing libraries can be employed.

Teensy also has a dedicated Audio library which in my opinion is very interesting. The library has a companion System Design Tool which allows to design an audio processing chain really quick by drag'n'drop, and then export it to the Arduino project.

Being a visual tool, Audio System Designer allows to explore the capabilities of the library without a need to go through a lot of documentation to get started. The documentation is built into tool. The only drawback of the docs is that they are too short. Although, this is partially compensated by numerous example programs.

The described audio capabilities are all based on the objects provided by Teensy Audio Library.

Output Power Requirements

My plan is to use an 8 Ohm 0.5 W speaker from Sparkfun for audio output in my project. Thus, I'm comparing output from audio amplifiers using an 8 Ohm resistive load and ensuring 2 VRMS output voltage (approx. 6 dBV). The goal is to achieve as "clean" output as possible.

Built-in Analog Output (MQS)

The chip that Teensy 4 is based on offers analog output solution which is called MQS for "Medium Quality Sound". Not to be confused with Mastering Quality Sound which has the same abbreviation. MQS on Teensy 4 is a proprietary technology of the chip maker (NXP). MQS allows connecting a small speaker or headphones to the chip pins directly, without any external output network.

Note the revision 3 of Teensy board has a built-in 12-bit DAC. MQS implements a 16-bit DAC with small Class-D amplifier. However, not very good ones. To me, "medium" in MQS is a stretch, coined by the marketing department, and perhaps it would be more fair to call it "LQS" for "Low Quality Sound".

Let's first take a look at a simple 1 kHz sine wave in time domain:

It definitely looks very jaggy to me. Another problem detected by using a DVM is a high DC bias offset: 1.64 VDC. It doesn't show up on the graph because the audio analyzer is AC-coupled. This amount of DC offset can pose a problem to line inputs and even to some speakers.

Another drawback of MQS is that the chip doesn't provide muting for the power-on thump. This can be worked around by adding a relay, after all it's trivial to control it using a PWM output pin, however if you have to use external parts, I would recommend using an external DAC instead.

Below are a couple more measurement graph revealing shocking simplicity of this output. First, as we can see on the frequency domain graph, there is no antialiasing filter, so we can see the mirror image of the original 1 kHz frequency and its first harmonic between 42–44 kHz followed by a direct copy. That means, the DAC/amp on the chip likely uses 44.1 kHz sampling rate.

Frequency response in the audible range is rather flat:

When I tried to achieve the required 0.5 W into 8 Ohm I could only squeeze out 1/100 of that (note that the graph is A-weighted):

In my opinion, due to absence of any filtering, turn on click protection, high DC bias, and low power, MQS output should only be used during development and testing—it's indeed convenient that a speaker can be attached directly to the board for a quick sound check.

External Output Devices via I2S

Since built-in analog output has serious limitations, I've started looking for external boards. Thankfully, Teensy supports I2S input and output. Teensy actually supports plenty of those interfaces, offering great possibilities for multi-channel audio I/O.

For my project mono output is enough. I tried a couple of inexpensive external boards to check how much the audio output improves compared to the built-in output.

MAX98357A DAC/Amp

I bought a breakout board from Sparkfun to try this IC. The datasheet calls the chip "PCM Class D Amplifier with Class AB Performance." Note that it's a mono amplifier which either sums its stereo input, or just uses only one of the two input channels.

Hooking it up to Teensy is extremely easy. One needs to connect the clocks: LRCLK and BCLK to the corresponding pins on Teensy, then connect I2S data (OUT1x, I used OUT1A), and of course power, which can be also sourced from Teensy. Then just use i2s or i2s2 output block in the Audio Designer. There is no volume control on this breakout board, only the amplifier gain can be changed.

MAX98357A IC can accept a variety of sampling rates and bit depts, however Teensy normally produces 44.1/16 audio signal. Looking at the white noise output we can see that the MAX IC employs a proper brickwall audio band filter at the DAC side:

The frequency response in the audible range is rather flat:

Another good feature of the IC compared to MQS is proper output muting on power on to prevent pops. The speaker output has almost no DC offset.

As for the jitter, the IC seems to employ clever synchronization tricks. Initially after powering on the jitter is gross and the noise floors is very high:

However, after 5–15 sec the IC seems to stabilize its input and drastically improve its output quality:

The MAX98357A was able to deliver the required 0.5 W albeit with a 10% distortion (this graph was obtained with the amplifier configured for 12 dB gain):

It's interesting that the 5th harmonic is dominating.

Considering the price of the chip, I would say that MAX98357A IC is a good choice if only mono output is needed and has a lot of advantages over the MQS output.

Audio Adapter Board

Since the times of Teensy 3 its creators were offering an "audio shield" board which is designed to cover the smaller version of Teensy completely. Due to some changes in pin assignments on Teensy 4 the design of the Audio Adapter Board was updated.

The audio part of the Adapter board is based on the SGTL5000 chip which in addition to ADC/DAC and amplifiers also offers some basic DSP functionality.

The Adapter board has line input and output, mic input, and headphone output. It uses I2S interface for communicating with Teensy. The board also offers an SD card slot and a controller for it. Note that although Teensy 4 has an on-chip SD card controller, there is no SD card slot on the 4.0 board. Adding it requires soldering a cable to the corresponding pins on the back side of the board, because the pin spacing and overall space is a bit tight for soldering an SD card socket directly. Thus, for a Teensy-based audio project it might be beneficial to attach the audio shield as it provides both analog audio I/O and an SD card.

One thing many users of this board noted is that is must be connected to Teensy using very short wires. The reason is due to use of an additional (compared to MAX98357A) high-frequency master clock input (MCLK) which runs at the frequency of several MHz.

The resulting jitter of the DAC is quite low, staying below 94 dB the carrier signal:

Surely, the SGTL5000 chip is advanced enough to have protection against the power-on thump. The level of distortions is tolerable (since it's a line output, I had connected it directly to the analyzer's input):

Note a noise peak at 60 Hz. I'm pretty sure it's the result of insufficient shielding on this board because the measurement was taken using differential input of the analyzer. This normally cancels out any EMF noise induced on the probe wires.

The headphone output of the adapter board isn't powerful enough to drive the load required for my project. So in addition to the adapter board an external power amplifier has to be used.

External Analog Amplifiers

I've tested two boards from Sparkfun: a mono Class-D amp, and a classic Class-AB amplifier named "Noisy Cricket". These amplifiers can be connected to the line output of the audio adapter board.

Mono Class-D Amp (TPA2005D1)

This is a low power IC amplifier for which Sparkfun has a breakout board. This is a rather old chip TPA2005D1 from Texas Instruments which advertises a 10% THD on its specs sheet.

And indeed it does have a 10% THD+N when driven up to the required output power (the graph is A-weighted):

Note that I tested this chip on its own, providing an input from the audio analyzer, and powering it using a bench power supply. Despite being tested under these "laboratory" conditions, the chip didn't show a stellar performance. I also tried supplying a differential input from the analyzer, and raising the input voltage up to the accepted maximum of 5.5 VDC but it didn't improve its performance.

It's interesting though, that being an unfiltered Class-D amplifier with 250 kHz switching frequency, this chip offers bandwidth which is enough to serve the full range of the QA401 DAC at 192 kHz sampling rate:

So it seems that there shouldn't be a big difference in terms of audio quality when using the MAX98357A chip via I2S directly, or TPA2005D1 via the line output of the audio shield.

Noisy Cricket (LM4853)

This is another IC amplifier from TI on a good quality breakout board by Sparkfun, which even includes a volume control. The IC is LM4853 amplifier chip (not just an op-amp). It can work either as a stereo amplifier, or as a mono amplifier in bridged mode.

The specs sheet of LM4853 shows much better distortion figures than for TPA2005D1. I had configured the board in mono mode and tested it in the same setup as TPA2005D1: powered from a bench power supply (at 3.4 VDC) and driven by QA401 signal generator. The results were much better:

The 3rd harmonic is 50 dB below the carrier level. For my toy project this is good enough.

Looking at the frequency response, we see some roll-off in the bass range, but I'm pretty sure that the speaker I'm going to use can't go that low anyway, so it's not a big deal:

So, Noisy Cricket is a good choice for me. Hopefully I will be able to achieve close to natural voice reproduction on my talking ABC.

Conclusions

Despite that boards based on Class-D chips are more compact and likely consume less power, when using a speaker of a classic cone construction it seems better to use a classic Class-AB DAC/Amp combination built from the Audio Adapter board and Noisy Cricket.

I'm putting a big rechargeable battery into this talking ABC, so higher power consumption isn't a problem for me. Additional convenience of using the audio shield comes from the fact that it has mounting holes and an SD card for storing audio samples.

If a more sensitive speaker could be used which requires less driving power, then an alternative solution is to use Teensy 4.1 which already has the SD card slot on board, and connect the MAX98357A DAC/Amp chip to Teensy's I2S output.


Bonus: Built-in Digital Output—S/PDIF

I have moved this section to the end because this output finds no application in my project. However, it's a new feature of Teensy 4 which also might be useful sometimes.

On the previous generations of the board, thanks to the efforts of the Audio Library contributors, it was possible to emit signal in the S/PDIF and ADAT formats programmatically. The nicety of the hardware support added in Teensy 4 is that it consumes less power and allows yielding the CPU to more interesting tasks.

The hardware S/PDIF output is as simple to use as MQS—it only requires connecting an RCA output to the board pins. This output only supports Audio CD output format: 44.1 kHz, 16-bit. I must note that although the built-in S/PDIF worked for me on the Teensy 4.0, on its bigger version 4.1 the S/PDIF sampling rate for some reason was setting itself to 48 kHz which made it unusable since Teensy Audio Library doesn't seem to support it. Thus, I could only test the built-in S/PDIF on Teensy 4.0.

Apparently, with a digital input there are no concerns about filtering or non-linearity in analog domain. One thing I was curious to check was the amount of jitter. I hooked up Teensy 4 to the S/PDIF input of RME Fireface UCX interface and then used the same J-Test 44/16 test signal generated using REW 5.20. RME was set to use the S/PDIF clock. I played the same J-Test signal on Teensy and via USB ASIO to be able to compare them. Here is what I've got—the blue graph is from USB, the red one is from Teensy:

As we can see, the output of Teensy has much more stronger jitter-induced components around the carrier frequency, whereas there are practically none for RME's own output.

Note that the peaks on the left side (up to 6.5 kHz) is some artefact of using 16-bit test signal on a 24-bit device (RME). I tried another DAC (Cambridge Audio DacMagic Plus), another computer, switched from PC to Mac, tried 16-bit J-Test sample from HydrogenAudio forum, but these spikes on the left were always there as long as I was using 16-bit J-Test signal, and they were completely gone on 24-bit test signal. I suspect there must be something in the process of expansion of a 16-bit signal to 24-bit that makes them appear.

Sunday, August 2, 2020

On Keyboards

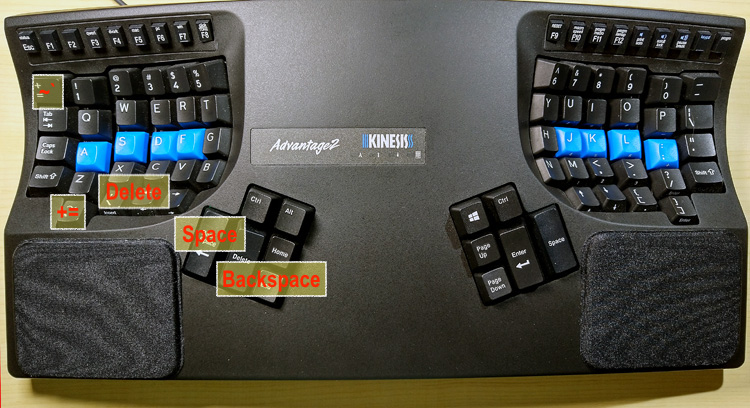
I want to tell a story about my current computer keyboard. A couple of weeks ago I switched to Kinesis Advantage2 keyboard. This device looks very unusual compared to most regular keyboards:

As you can see, the design brings the ergonomics to the extreme and fulfills several goals:

  • provide integrated wrist rests;
  • make better use of thumbs by putting more keys under them;
  • achieve more natural wrist positions;
  • provide similar path length from main 4 fingers to alphabet keys.

However, with this design a lot of keys were moved away from their usual positions. The most notable differences are for the arrow keys, brackets, and the keys that are located at periphery positions on traditional keyboards like functional keys, tilde, and plus.

I'm not new to ergonomic keyboards. For a very long period I used another keyboard by Kinesis called "Freestyle2":

As you can see, this keyboard is also ergonomic—it consists of two halves that can be positioned at various angles. However, its layout is more traditional and even somewhat superfluous—I've never made a good use of the "shortcut" keys on the left (mostly because I use actual shortcuts for all the actions these keys intend to provide, and I can't use them for anything else as the keyboard doesn't allow for remapping).

I'm in fact a big fan of keyboard shortcuts and learn them in any application I use more or less frequently. I can't imagine using GMail without shortcuts—at my job I receive from 100 to 200 emails per day. While I was still using Freestyle2 I started noticing that my right hand is aching after I had been using the bracket keys while going through my inbox (the bracket keys are used in GMail to archive the current email and go to the next one) and after active use of the arrow keys for navigating in Emacs.

The Advantage2 keyboard was sitting in my drawer for a long time (at the beginning of the COVID lockdown I had managed to get it at my company's expense) but I was hesitating to start using it due to its unorthodox layout. And as I've got the hand ache from using Freestyle2 I decided that it's a good opportunity to give Advantage2 a try.

I must admit, it took about 2 weeks until I could finally use it without an extra mental effort for finding keys. The most infuriating was "re-learning" the key combinations in Emacs. For a lot of them over the years I simply forgot what the actual keys are and was invoking them using muscle memory exclusively. Since the key layout on Advantage2 is different, I had to recall what are the keys used for the combinations and had to learn where to find them on this keyboard.

Now I can clearly see benefits of using Advantage2: no wrist or arm aching and typing feels more comfortable than on a traditional keyboard. Also, unlike Freestyle2 the Advantage2 keyboard is programmable, meaning that you can remap keys and even record macros. I actually did a couple of key remappings to make my typing more comfortable.

Key Remappings

First, I remapped the back space key (it's under the left thumb, mirroring the space key under the right thumb) to serve as the second space key. This is after my habit of having two separate space keys on Freestyle2—I noticed that I end up pressing the back space key on Advantage2 when I wanted to type a space.

OK, but the back space is a really useful key after all—where should it go? I moved it to the nearby "Delete" key. It is still convenient for an active operation. Good, but "Delete" is also useful in various file managers as it allows deleting stuff. I found that on the left side Advantage2 has an "extra" key—another copy of the backslash key:

It's also used as the "Insert" key when you turn on virtual numeric keypad. So I thought it's a good semantical link between "Insert" and "Delete", and assigned the latter to this extra backslash key.

Finally, if you use Unix shells a lot you'll notice that the tilde key is used very frequently. On traditional keyboards it's located to the left from the number row. On Advantage2 for some reason this place was given to the "+/=" key and the tilde key was moved to the bottom:

The natural solution is to swap these two keys. So this is the layout I ended up using:

And yet another cool feature of this keyboard is that all remappings and macros are available as text files exposed on keyboard's internal USB drive. For example, this is how my remappings are specified:

[=]>[`]
[`]>[=]
[intl-\]>[delete]
[delete]>[bspace]
[bspace]>[space]

This is what makes this keyboard a truly professional one.

Practicing Typing

For a long time I practice my typing on Tipp10 site. I know, there are myriads of similar touch-type training sites. What I like about Tipp10 is their scoring system which penalizes for typos. This stimulates you to type slower but with less mistakes and build up speed slowly. The site also allows for uploading your own typing lessons.

Building typing speed is something that doesn't come easy for me. I'm trying to find any book or instruction that would be based on a research on neuro-motor skills, but so far found none. The closest thing I found is this free book on playing piano called "Fundamentals of Piano Practice." It gives some practical advises on the exercises for developing finger muscles and improving finger coordination, which helps to build up speed and accuracy.

Of course, typing and playing piano are very different activities, however I believe that they share some goals. I've learned a couple of things from this book.

First is what they call "Hand Separate" practice. I've found that my right hand is somewhat weaker and less accurate than the left one, partially because I'm left-handed, and also because I had a minor injury of my right hand resulted from winter biking. So it helped to train this hand more intensely. This is where the design of Advantage2 is a real advantage—the hand zones are clearly separated.

The second technique is what the book calls "Parallel Sets" (PS for short). Their strong side is that they can serve both as diagnostic tests for the finger movement fluidness and as an exercise for developing it. The practice of the parallel sets is described to length in the book, so I will not repeat it here. This is just an example of custom typing exercises that I had created for myself in Tipp10 (for QWERTY layout):

PS Exercise 1

aaaa x8, jjjj x8, ssss x8, kkkk x8, for all front row keys.

PS Exercise 2

asdf fdsa asdf fdsa asdf fdsa asdf fdsa
as as as as sa sa sa sa
sd sd sd sd ds ds ds ds
df df df df fd fd fd fd
asd asd dsa dsa asd asd dsa dsa
sdf sdf fds fds sdf sdf fds fds

And similar sequences for the right hand. There is also a variation where I type left and right hand interleaved, for example:

ajsk ajsk ajsk ajsk ajsk ajsk
skdl skdl skdl skdl skdl skdl

PS Exercise 3

ad ds sf ad ds sf ad ds sf ad ds sf
ads dsf ads dsf ads dsf ads dsf
adsf adsf adsf adsf adsf adsf adsf adsf

And similar sequences for the right hand. This exercise is actually challenging. I've found that it really helps to do it for each hand in isolation first.


In fact, all these exercises help to feel difference between keyboards. I was doing them in parallel on Advantage2 and Freestyle2 keyboards, and I immediately felt the convenience of curved hand wells of Advantage2 that helped to make the glide of fingers more fluid.

Conclusions

I'm glad that I have switched to this keyboard. Among positive sides I would specify:

  • great ergonomic design;
  • flexibility in configuration which makes this keyboard a real professional tool.

And on the flipside:

  • unorhodox layout which can interfere with muscle memory developed while writing program code and using code editors. This isn't a bummer, just requires some time for updating your muscle memory;
  • high price (but good quality).

I think Kinesis had understood these problems and at some point they have introduced "Freestyle Pro" keyboard which has the design of Freestyle2 and the customization engine of Advantage2. It is also cheaper than Advantage2, so seems like a good alternative to me.

Thursday, July 9, 2020

DIY Headphone Equalization

Motivation

Back in time I already experimented with commercial packages for headphone equalization: Morphit by Toneboosters and Reference by Sonarworks. They offer means for correcting the frequency response of selected models of headphones in order to bring the sound closer to either a "reference" target curve or to the sound of some other model of headphones.

Although I still own Morphit I decided to try to devise my own way for headphone equalization. I had the following reasons for this:

  1. Although the range of headphone models measured by Toneboosters is quite wide, some of the models I do use: Audeze EL-8 Closed and Open are missing.

  2. I intend to use parametric equalizers with limited number of filters available—the equalizer built into MOTU AVB card. I also want to avoid using computers to save myself from the noise of their fans.

  3. I wanted to be sure that I apply correction that is relevant to my pair of headphones and to my head. Sonarworks emphasize that there are variations between different pairs of the same model and offers a service to measure your pair, or to sell you a pair of headphones which they have measured on their rig. I would also add that the low end performance of over-ear cans would differ depending on the state of the pads and the shape of the head of the person wearing them.

Thus my plan was to perform my own measurements of the headphones I have and try to bring their sound closer to each other. The practical task I had at hand was to bring the sound of Beyerdynamic T90 and Shure SRH1540 to the sound of Audeze EL-8 I mentioned above. Why to do that? One word—comfort. Let's compare how much do weight the headphones I own (with cable):

Model Weight, grams
Audeze EL-8 Closed 576
Audeze EL-8 Open 533
Beyerdynamic T90 394
Shure SRH1540 331
Massdrop 6XX 317
AKG K240 Studio 290

Although I really love the sound of EL-8 (both variants) their weight is killing me! So my plan was to equalize T90 to sound like the open model and SRH1540 to sound like the closed model. I chose T90 and Shure because their sound feels as "spacious" as in EL-8s, and it's only their tuning that feels wrong to me: T90 have too much highs, and it's unnatural and fatiguing, while SRH1540 have a very pronounced V-shaped tuning which I wanted to "flatten".

Measurement Methods

I used two methods I had previously mentioned in this post: moving microphone averaging (MMA) and on-head measurement using Sennheiser Ambeo Headset. Since the time I've made that post I've got a couple of updates on them.

Clock Drift with Ambeo Headset

One problem I had with Ambeo Headset is that due to lack of external synchronization use of Ambeo's ADC for input and an external DAC for output resulted in clock drift which creates a spectral shift when doing long (lasting several seconds) sweep measurements.

I have partially solved this problem by using the feature of Mac OS X audio system called "Aggregate Device". It allows combining two or more digital audio devices into a single one, and what's important, takes care of synchronizing their clocks:

This actually fixes the problem with shift of the measured amplitude across spectrum. However, because the drift correction only happens at certain periods, there is still phase shift occuring, especially at high frequencies. Due to this care must be taken when averaging multiple measurements.

MMA and Ambeo On-Head Methods Accuracy

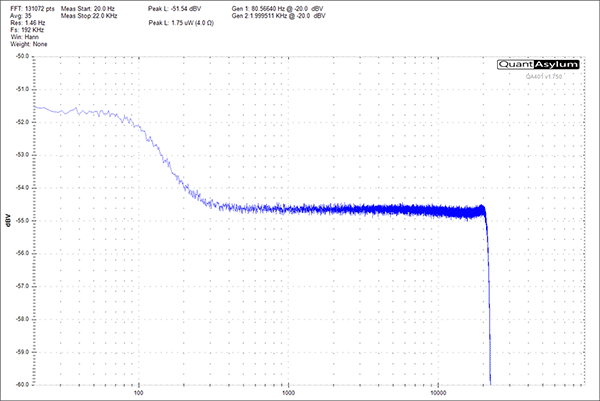
Recall that I tried using the MMA method for reverse engineering the equalization applied by Audeze Cipher Cable for EL-8. Recently I cross-checked these measurements by performing an electrical measurement of this cable into a dummy load. Here is the FR graph acquired by QA401:

It confirms that there is a bass boost, but no other modifications, whereas my MMA measurements were also showing a "scoop" at middle frequencies. So turns out that scoop is a measurement error.

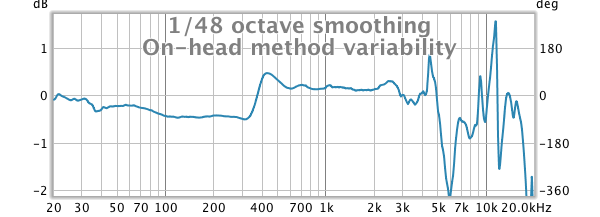
I decided to figure out the accuracy and usable range of both methods by doing several measurements in a row, averaging the result, then repeating the same process and comparing the averages. For the MMA method I came up with the following graph:

As we can see, the usable range is from 200 Hz and the variance is within +/- 0.5 dB. While on-head measurement using Ambeo headset gives the following:

So, the usable range is up to 4 kHz with the same variance. That means, the range from 200 Hz to 4 kHz can be used for judicious merging of the curves. Note that the resulting curve can't be compared with measurements obtained using standard headphone rigs. However, it can be used for comparing the tuning of various on-ear headphones and deriving equalization between them.

Note that even measurements done using different "standardized" head and torso simulators still can't be compared directly, as it can be seen from the past exchanges between Tyll Hertsens (ex-Innerfidelity) and Head-Fi, and Audeze.

Also note that before averaging the measurements done using Ambeo Headset I had to convert them to minimum phase first, because the clock drift I mentioned above produces skewed phase:

Thus we can only average the magnitude data. But that's OK considering that the MMA method, being a single channel measurement also provides magnitude data only.

The Equalization Process

This is the process I used:

  1. Obtain an averaged measurement of the headphones' left driver from 5 MMA measurements. I was performing these measurements by waving slowly the headphone earcup playing pink noise in front of the Beyerdynamic MM-1 microphone while capturing RTA 1/48 octave measurements in REW with infinite aveaging until I've reached 100 averages.

  2. Obtain an averaged measurement of the same driver from 5 on-head reseatings, this time using a 1M measurement sweep from the headphone into Sennheiser Ambeo Headset microphone.

  3. Merge the averaged measurements somewhere between 1 kHz and 2 kHz. I understand that this brings uncertainty in the process. However, the point can actually be found by comparing the slopes of the two curves. I applied 1/12 octave smoothing to both curves to simplify the process.

  4. Repeat the same process with another pair of headphones.

  5. Calculate the equalization curve by performing "A / B" operation in REW, where A is the curve of the target headphones and B is the curve of the headphones being equalized.

  6. Approximate this curve by adjusting PEQ in MOTU AVB equalizer.

Now here is an example of applying these steps to equalize Beyerdynamic T90 to sound like Audeze EL-8 Open back.

Below are the averaged graphs obtained for T90 from MMA and on-head measurements:

The merge point is at 2 kHz. And below are the averaged graphs for Audeze EL-8 Open:

Note that the 5–8 kHz drop that Tyll and Audeze were arguing about is absent from the MMA measurement. Whereas the notch around 5–6 kHz seen in on-head measurements done using Ambeo headset is the artefact of this headset, it appears on almost all measurements I've done using this technique.

And after we have obtained two merged curves it's time to divide them and obtain the suggested equalization curve. Below this curve is superimposed with the actual curve I've ended up using applying using the parametric equalizer of MOTU AVB. It doesn't follow the suggested curve precisely, it's a compromise that takes into account capabilities of the DSP on MOTU and my subjective judgement obtained by fast switching between these headphones on various tracks:

As we can see the equalization does shave off some high frequency from the factory tuning of T90 making them sounding more neutral.

And the similar procedure has been applied to equalize Shure SRH1540 to sound more like Audeze EL-8 Closed back. The suggested and resulting equalization curves are below:

The major correction here is to "straighten" the V-shape of the factory tuning.

The downside of the equalization done using IIR PEQ filters is non-uniform group delay. Ideally we would want to use linear phase filters. This is something to consider for future improvements.

Conclusions

Personally I liked the result of re-tuning which allowed me to combine the comfort of one pair of headphones with the sounding of another pair. As with any equalization we need to understand its limits. Of course, the properties of the drivers used in the headphones have great influence on the perceived sound "quality". As an example, initially I tried to make Massdrop 6XX to sound like EL-8 Open (recall that 6XX are second lightest headphones among those I have), however I was missing the sense of spatiousness and of having the soundstage wider than the headphones. T90 replicates this feeling better.

What are the alternatives for the approach I used here?

  1. Use ready-made equalization toolkit like Morphit. Pros are obvious: you just select the source and the target headphones and start "morphing". However, its database is not complete, and after all, you don't know how close your two pairs of headphones are to their measurements.

  2. Use some database provided by an enthusiast. Similar to the previous one but this time the equalization curve must be derived by yourself. This is doable if the database provides the data in some numerical format, not just pictures. Here the same concern about the variability between headphone instances applies. Be sure not to mix measurements provided from different sources. I know it appears compelling to compile graphs from various sources in order to create the most complete database, but this just doesn't make sense since curves from different rigs are not directly comparable. Reading this post by Crinacle explains a lot of things that can deviate from rig to rig.

  3. Order calibration for your headphones from a company like Sonarworks. I would do that if I were using headphones for professional music production, but for entertaiment purposes this seems like an overkill. Also, at least Sonarworks provide calibration data in a proprietary format only usable with their software. And fulfillment of measurement orders takes weeks, so it would be wise to approximate the equalization on your own before committing to that.

  4. Buy or build a complete measurement rig. Yes, that's the way to go if you intend to perform measurements and equalizations routinely. Here the question is about the reliability of measurements. For example, I've heard from owners of the miniDSP EARS rig that it's not very accurate at high frequencies, thus either a lot of averaging is required, or use of a different method like MMA is needed for obtaining measurements in that region. Whereas rigs from GRAS and other established measurement companies are pricey.

Saturday, June 20, 2020

Marantz AV7704 as Audio Hub

I have a Marantz AV7704 A/V receiver that I was using for some of my work projects. I know Marantz well for their classic "Hi-Fi" equipment: CD players and receivers. Originally an American company, it was acquired by its Japanese competitor Denon, forming a "D&M" holding. Then the holding was bought by "Sound United" which now owns "Classé", "Denon", "Marantz", and "Polk" brands. We can only hope that all these corporate games didn't degrade the quality of the products.

Up until the last month I was considering this receiver for work usage only but lately I decided to give it a bit more use and hook it up for my daily listening. My goals were:

  • eliminate computers and any other equipment with fans from the playback chain;
  • have convenient remote controls;
  • ensure that audio path is clean and works to its full performance.

So let's see how this receiver performs. The documentation on its technical capabilities is quite scarce, it will be useful to fill up missing information on measurements.

First Look

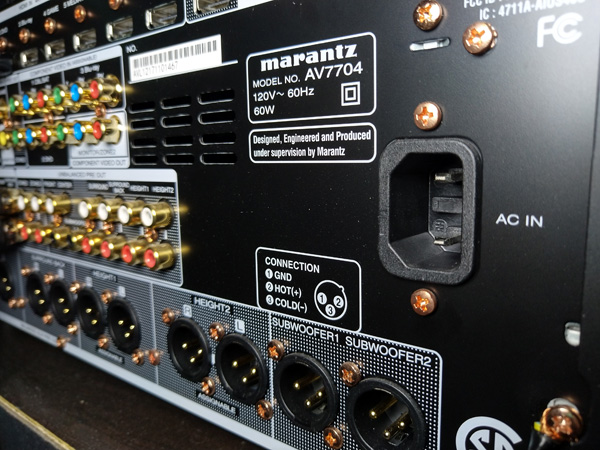
This is quite a versatile receiver. If you look at its back panel there is no shortage of inputs and outputs:

AV7704 supports 3 audio zones, and its remote has 14 buttons for selecting an input. The inputs utilize a range of technologies from good old analog to digital wireless. This is somewhat overwhelming. I decided to wear a consumer hat first and see what functions I can utilize.

Inputs

My usage of AV7704 is 95% for audio playback. I have the following "use cases":

  • streaming lossy stereo audio (Google Play Music and YouTube);
  • playing lossless stereo audio from a home server (FLAC files);
  • playing surround audio from a home server (DTS, MKA and MKV files).

Currently I have a stereo setup but nevertheless I enjoy listening surround re-issues of famous albums downmixed into stereo for headphones (binaural). Sometimes surround remixes reveal background details that I missed on the original stereo mixes.

What AV7704 can offer to me? It has a built-in HEOS player which supports some streaming services and Internet radios, however Play Music is absent from the list. Not a big problem—I have a Chromecast HDMI dongle and NVidia Shield TV Pro set-top box that I can connect to HDMI inputs.

Playing local stereo is of course supported by HEOS, and the most convenient way for making files from a local server to be accessible to HEOS seems to be via a Plex server. In theory HEOS can connect to network shares directly, but I couldn't make it work.

Unfortunately, HEOS doesn't support surround audio files and neither does Chromecast. Shield comes to the rescue offering a Plex client and VLC apps. Both support "pass-thru" mode for sending encoded surround audio to the HDMI output of Shield directly.

AV7704 also has support for Bluetooth and AirPlay. However, Bluetooth is obviously lossy and limited to stereo, and AirPlay requires using a computer or an iOS device—not my option.

Outputs

Here I've got somewhat atypical demands. I need optical output to feed the miniBox for LXminis and the subwoofer, with volume control! I need parametric equalizers for interfacing SPL Phonitor mini headphone amplifiers.

This is where AV7704 falls short for me—it only offers HDMI outputs and analog outputs (line and headphone), no SPDIF. Also, the EQ on this unit is a classic "Graphic EQ" with fixed bands and no adjustment for the "Q" value of filters. It's good that this receiver at least offers tone controls, I will need to use them when playing some records.

It is possible to split off SPDIF from an HDMI output by using one of numerous "HDMI Splitter" boxes. I was considering that until I discovered that AV7704 only offers volume control on its analog outputs—not when sending audio via HDMI.

Failure? Not really—I have a trump in my sleeve—MOTU Ultra Lite AVB card which I was previously using for my surround setup. This card has 6 high quality line inputs, DSP, and both analog and digital outputs. So I can use to complete the HDMI receiver and Dolby / DTS processing functions of AV7704, great! And MOTU AVB can work on its own, without a computer, thus my initial requirement is still fulfilled.

The remote control requirement is fulfilled by AV7704, the companion HEOS app for Android, and obviously other apps on Android that can work with Chromecast.

Configuration

This is how I hooked things up:

I decided to use Zone 1 output for headphones (driven by SPL Phonitor minis). XLR outputs of AV7704 connected to inputs of MOTU AVB for headphone equalization. Since the headphones are connected to Phonitors which have volume controls, I don't need to control volume on AV7704. So potentially I could send audio to HDMI, split it out as SPDIF and send that to MOTU optical input. I considered that option but found it inconvenient because first, this will require adding yet another electronic box to the configuration, and second, this will force MOTU AVB to be clocked at the same sampling rate as HDMI audio, which is normally 48 kHz. So using the analog XLR output is more robust, although it adds an extra D/A->A/D conversion.

Specifically for surround downmixes I would prefer to use the headphone output of AV7704 (HPH on the diagram) because typically there are differences in how Dolby and DTS downmix to speakers vs. headphones since the latter offer much better channel separation.

And Zone 2 output (only RCA is offered for it) is used for LXminis. Since the miniBox is about two meters away from AV7704 and is powered from a different outlet I decided to use optical connection between AV7704 and miniDSP in miniBox for full isolation and less noise. For the speakers I have to use the volume control of the AVR so the analog output is the only option here. In order to convert analog into TOSLink I also use MOTU AVB.

With all these extra D/A and A/D conversions and use of analog outputs on AV7704 it is important to verify that there is no signal quality degradation due to noise, output or input overload, or any other issue. Also, AV7704 offers options like "direct" output which clams to provide "purer" output and I'm curious to validate these claims.

Verification

Digital Inputs

Need to recall two issues that can happen with digital recordings that do not leave enough headroom due to aggressive mastering. The first is clipping of intersample peaks during resampling. The problem illustrated below:

If a record is digitally mastered in a way that puts non-peak values of waveforms to maximum (or minimum) values of a particular integer representation (16-bit or 24-bit integers), then resampling can yield values that are outside of the domain of the integer representation, which means clipping. This is what I have encountered with Google Nexus Player with its mandatory resampling of 44.1 kHz content to 48 kHz.

Presence of this problem can be detected purely in digital domain by capturing the digital output of the player. I decided to check Chromecast, HEOS, and Shield whether they have this issue. For that I used the same test files as back in 2017: a sine wave phase shifted by 45° and "normalized" to 0 dBFS digitally.

Recall that this isn't just a DSP geekery but rather a real issue encontered in commercial CD recordings that were engineered to sound "louder".

This is the test setup I used:

I was capturing the digital output digitally by sending audio to HDMI and using a splitter. The optical output from the splitter was captured by MOTU AVB. What I've found is that Chromecast and HEOS do not attempt to resample the input signal and hence do not clip it, whereas Shield Pro always opens the HDMI output at 48 kHz and resamples 44.1 kHz inputs to 48 kHz with clipping. Thus, the conclusion is—avoid using Shield Pro for music playback except for encoded surround audio which is sent to the AVR directly for further decoding, or if you are sure the audio is at 48 kHz already.

I also checked if I can ditch HEOS in favor of Chromecast for local playback too, but quickly discovered that VLC can glitch when casting to Chromecast, while HEOS always plays flawlessly.

AV7704 Analog Outputs

What I wanted to verify is whether the quality of the XLR, RCA, and the headphone output of AV7704 are on par with each other. I used Cambridge Audio DacMagic Plus as a reference. I verified that its XLR and RCA outputs in fact have the same linearity and I was expecting the same from AV7704.

However, as I started measuring I found that the RCA output of AV7704 is much noisier than XLR. The fact that the noise was fluctuating as I was touching the unit's screws at the back lead me to the conclusion that it is missing proper grounding. Indeed, the power input of AV7704 is two-pronged so the enclosure if "floating". I can understand why the manufacturer has done that—it's in fact typical for consumer equipment which normally uses unbalanced connections and thus there is a high chance of creating a ground loop. However, instead of simply not grounding the enclosure I would prefer to have a "ground lift" switch as the last resort for solving ground loop issues.

After I grounded the box by connecting a copper wire to one of the screws on the back with one end and to the power strip enclosure on the other, the noise situation has become much better and indeed XLR and RCA started showing similar performance. It seems that Cambridge Audio DAC is engineered better than AV7704 since it performs great without requiring to be grounded.

As for the headphone output, I measured its output impedance and found that it's quite high—39 Ohm which means it can only damp well headphones with high input impedance—300 Ohm or higher. Recall that I plan use the headphone output for surround renderings, and my preference is to use IEMs in this case, as they have less interaction with my ear pinnaes. Since IEMs typically have very low impedance, I ended up connecting the headphone output of AV7704 to the line input of MOTU AVB which constitutes a perfect load for this headphone output.

Yet another thing to consider is what is the optimal output level from AV7704. This receiver in fact provides several options here:

  1. Attenuated output: 0 dB down to -79.5 dB.

  2. Amplified output: 0 dB up to +18 dB in case if the digital program level is too low.

  3. Pure Direct output mode which bypasses processing circuitry and turns off all analog video circuits in an attempt to lower the noise.

The hardware test setup was essentially my playback setup. I only added one extra connection: TOSLink output from MOTU into AV7704 "CD" input. Here is how XLR, RCA (Zone 2), and the headphone output are seen by MOTU AVB when the output level on AV7704 is set to -6 dBFS. I was using REW tone generator to produce a sine tone of 1 kHz at maximum dBFS:

As we can see, the headphone output (red) has the highest output level and also the highest level of noise and harmonics. It's interesting that only the headphone output has a small spike around 60 Hz which didn't went away after I grounded the receiver.

The most linear output is XLR (green). It seems that -6 dBFS is the sweet spot for it, as reducing attenuation to 0 dBFS significantly degrades its linearity and in "amplifying" modes performance is unacceptable.

I was curious whether "Pure Direct" mode can deliver better performance for Zone 1 outputs, however the results practically didn't change at all. However, I don't use analog video inputs and outputs (I'm curious who would these days), so perhaps there is no interference from them in the first place. To me, the "Pure Direct" mode looks like a heritage of the old days, and I would prefer Marantz to remove the analog video I/O at all rather than adding this mode.

In contrast, the Zone 2 RCA output (red) provides better S/N ratio when amplified (at the cost of a slightly higher distortion), but only up to a certain point. For it, +9 dBFS is the frontier of linear behavior.

The summary of THD and noise for different outputs of AV7704 is in the table below. Note that I ran MOTU at 96 kHz sampling rate and didn't use a low-pass filter, thus the THD and noise figures are across the whole range up to 48 kHz.

Output, mode 1 kHz RMS (Z) THD Noise THD+N
Z1 XLR, -6 dB -13.2 dBFS 0.0019% 0.0021% 0.0029%
Z1 HPH, -6 dB -9.2 dBFS 0.0018% 0.0027% 0.0033%
Z2 RCA, -6 dB -21.8 dBFS 0.0034% 0.0063% 0.0072%
Z1 XLR, 0 dB -7.2 dBFS 0.012% 0.0044% 0.013%
Z2 RCA, +9 dB -6.7 dBFS 0.0047% 0.0036% 0.0059%

The official specs of AV7704 specify distorion at 0.005% over 20 Hz–20 kHz range (not specifying signal level), so it seems that my measurements are in the same ballpark.


Yet another problem that can be encountered with DACs is lack of headroom for intersample peaks. Even if there is no resampling involved, DAC still can clip intersample peaks on aggressively mastered tracks. As we can see below, putting non-peak values of waveforms to maximum / minimum integer values can result in having the peaks between samples to reach +2.6 dBFS:

Presence of this problem is checked by using the same files that I used to detect intersample peaks clipping in digital domain. I checked AV7704 and it doesn't have this problem, good!

AV7704 Tone Controls

Tone controls are available for Zone 1 only and offer modification of bass and treble in the range from -6 dB to +6 dB. I was also interested in their operating frequency range and slope. Below are the graphs of the transfer function for the tone controls:

The slopes of the tone controls are gentle, which is good. There is some phase distortion which indicates that the tone controls are implemented as recursive (IIR) filters, however due to gentle nature of the phase changes the resulting group delay is zero.

I'm pretty sure the tone controls are implemented in a DSP as they are very precise (unlike JDS Labs Subjective 3), and it seems strange to me that the control steps are 1 dB. I would like to have a better precision, at least by half of a dB.

Conclusions

All in all, Marantz AV7704 offers good quality analog outputs. Even the secondary zone offers good performance. From my experience, this receiver works reliably and predictably. I haven't encountered any serious glitches during a couple of months I was using it. The built-in HEOS player is useful and offers good quality playback.

Being a "consumer-oriented" (not a pro device), this receiver has some useless extras, like the analog video I/O and "Pure Direct" mode. These are seemingly relics from past models, and Marantz, being a part of a big consortium isn't very good at trimming extra functionality. I would gladly trade these "features" for a digital audio output with digital volume control which I could use for connecting LXminis.

Some annoyances that I have noticed with AV7704:

  • turning connected TVs and monitors on and off interrupts audio playback; I guess, the AVR attempts to recognize the capabilities of the connected unit, however I'm not sure why the interruption happens even when the unit is being disconnected;
  • interruption of audio also happens when changing audio modes and settings;
  • HEOS app on Android can't play album tracks in the album sequence, and this is ridiculous as D+M is aware of this, and the fix is supposedly one line of code; at least, the version of HEOS app built into the receiver doesn't have this problem; UPDATE:HEOS Android app from Jun 6, 2020 (1.562.200) plays album tracks in correct sequence, thanks D+M for the fix!
  • HEOS app is limited to stereo tracks only;
  • there is no indication of the current Zone 2 settings neither on the AVR panel nor as OSD on the Zone 2 TV, and this is very inconvenient; for example, to set up the output level of Zone 2, I had to go to the Settings menu of the unit.

Note that I haven't covered here capabilities of AV7704 in decoding surround audio and downmixing it into 2 channels, I hope to do that later. Also I haven't coverted the built in room correction module (Audissey) partly because I do it externally on miniDSP units, and it only applies to Zone 1 which I use for headphone playback only.

Monday, June 8, 2020

Switched to Markdown

After writing about 50 posts I decided to do something about how I typeset them. Previously I was using Blogger post editor in "Compose" (WYSIWYG) mode. It allows to get job done, however there was no complete control over the details of formatting. For example, I like to use non-breaking spaces between values and their units, as in "1 kHz", so they don't end up on different lines. However, Blogger editor doesn't show "special" characters. They can only be viewed in HTML mode, however the text looks overwhelming with all the extra tags and attributes that Blogger's WYSIWYG editor throws in.

Another huge missing feature of the Blogger editor is "find and replace". There is "find" function built into the browser but no "replace". Again, you can work around by copying the HTML source into a capable editor, doing all the work there, then pasting back. Hopefully you haven't screwed up the HTML tags.

I realized that I would like to use my favorite editor for writing posts and then convert them into HTML (just once!), paste the result into Blogger and be happy. These days Markdown is the standard way for typesetting moderately complex pages, and its minimalist nature makes the page source look very readable even without syntax highlighting.

So Markdown it be. Where is it convenient to store Markdown sources? GitHub pages is a good place since GitHub offers a built-in renderer for them. The renderer also adds some nice "extensions" to basic Markdown. Decided—I will use GitHub pages for storing the Markdown originals and continue posting them on Blogger, because people actually do read the posts there.

Converting old pages

As an experiment in feasibility of this approach I decided to convert my existing blog pages to Markdown and "distill" them back into HTML. This would help to establish the process and iron out all the possible issues. This also ensures that the blog "mirror" on GitHub doesn't have dangling links to old posts.

I downloaded the archive of this blog via Blogger's "Back up content" function. It provides a huge XML file containing all the posts in HTML format, so it's easy to cut out their content for further processing.

For conversion I used Pandoc tool which among numerous formats supports both HTML and GitHub "flavor" of Markdown. So, for the old pages the process was as follows:

  1. Save the post as HTML file, convert it into GitHub markdown using Pandoc:

    pandoc input.html -f html-native_divs-native_spans \
    --shift-heading-level-by=-1 --atx-headers -t markdown_github \
    -o output.md

    By trial and error I figured out that I like the results of the deprecated markdown_github converter better than its gfm replacement. For some pages I used --shift-heading-level-by because I was using <h3> HTML headers and needed to have them "level up"-ed.

  2. Clean up the converted Markdown: remove trailing whitespace, extra line breaks, make sure all non-breaking spaces are in place, etc.

  3. Preview the Markdown file using excellent grip tool. This saves from unnecessary uploads to GitHub.

  4. Convert the Markdown back to HTML for Blogger:

    pandoc output.md -f markdown_github -t html -o distilled.html
  5. Paste the "distilled" HTML back to Blogger.

  6. Upload the Markdown to GitHub.

  7. Compare the looks and make necessary adjustments to Blogger styling.

The last step also helped me to resolve long standing annoyances with the default CSS styles used by "Awesome Inc" Blogger theme. I put my CSS overrides into "Advanced > Add CSS" section in the theme editor.

BTW, I'm not exaggerating about the converted back HTML being "distilled". Blogger puts so much superfluous formatting that the size of a file containing a post from Blogger typically reduces by 25–50% after converting back and forth via Markdown!

Of course, the conversion isn't without flaws, and Markdown does in fact offer less formatting capabilities than Blogger. Let's consider the differences in detail.

Post links

I decided to use the same file structure for Markdown posts, this makes converting links easier. The conversion is needed because GitHub uses names of the Markdown files—md extension, while Blogger uses html. I made all the post links to be "site relative" (starting from /) so it doesn't matter where the page is actually hosted.

This way, a link to a previous post in Markdown looks like this:

[as shown in the previous post](/2019/06/previous-post.md)

and when "distilling" Markdown source to HTML I replace md with html.

Update Mar 28, 2021 I've noticed that Github now only replaces .md to .html extension in the links of the top-level README.md. So I have changed all other cross-references in posts to use .html:

[as recently shown in the previous post](/2019/06/previous-post.html)

This is even better as now there is no need to do the aforementioned replacement.

Pictures

There are a lot of pictures in this blog, I decided to leave them hosted on Blogger. The reason is that Blogger server can resize the picture to a smaller size from the parameters specified in the image URL. These smaller images are used for previews in the article. After clicking on the preview a full size picture is served. This is more efficient than serving a full picture only and sizing it down in the browser.

This approach also works when links to images host on Blogger are used in Markdown arcticle on GitHub. As I've figured out, GitHub in addition makes a copy of any externally hosted image for serving from its own CDN, so it really doesn't make sense to pull out images to GitHub manually.

One notable loss is that Markdown doesn't allow specifying alignment and interaction with text for pictures, so they are always aligned to the left and can't have text fills on the size.

Code

Up to the redesign Blogger wasn't offering dedicated code formatting. I used monospace font with non-breaking spaces for sequences of multiple spaces. While converting, I changed all those code fragments to use Markdown fenced code blocks.

Tables

Similar thing for tables. I used tabulated monospaced formatting. This wasn't super convenient. I converted these ersatz tables into Markdown tables which translate into actual HTML tables for Blogger. This looks better. The only inconvenience is that GitHub Markdown doesn't allow "headerless" tables.

Colors

Markdown doesn't have means for colorizing text. It's actually good for accessibility (think screen readers, color blind people), but I used to highlight text with colors when discussing graph. Now I will have to provide more annotations on the graph itself.

Miscellaneous

  1. In Markdown the header of the post is specified on the first line using # style (heading level 1). In Blogger the header stored separately.
  2. Special characters like "non-breaking space", "em dash" need to be written using corresponding Unicode characters in Markdown. Note that the sequence of three dashes --- is used in Markdown for horizontal breaks.

Writing a new post

I'm writing this post in Markdown and the life feels good. The only culprit is adding pictures. I still want them to be stored on Blogger. For example, I want to post an image of the same post in Blogger and on GitHub. Here is what I have to do. After preparing the image, I upload it to Blogger and insert into the post draft. Then I copy the link and transform it into Markdown link format. This is the result:

The GitHub mirror of this blog is now located here: https://mnaganov.github.io

Testimonials

Both Pandoc and grip are awesome tools that helped me a lot with converting my posts into Markdown and back into HTML. I highly recommend them for any document conversion work and Markdown authoring.

Saturday, May 2, 2020

Sennheiser Ambeo Headset Applications

As I have mentioned in the previous posts about optimizing audio in our Mercedes GLK, I used Sennheiser Ambeo Headset as a measurement device in the car. In this challenging acoustical environment it allowed to achieve better channel matching than a conventional measurement microphone. I decided to make a dedicated post about this headset because I've found some interesting applications for it.

Overview

I discovered this headset at the AES Headphones conference where it was used in conjunction with Magic Leap's One AR glasses. By the time when I decided to buy it for my experiments, Sennheiser had already abandoned its production. Nevertheless, it's still possible to buy leftovers from the stock and used gear.

This is how this device looks:

By comparing it with the image on the packing box it's easy to spot a marketing trick. On the box the controlling unit is pictured from the side, making an impression that it's thin and long. However, in reality this unit is pretty thick and looks a bit ugly:

The headphones themselves are designed to be worn around ears, sports-style. They don't however feel sturdy enough like a real sport-style headphone should—yet another perceptual mismatch. Overall, the look of these headphones isn't too exciting, certainly not as appealing as "iconic" Apple earbuds.

Speaking of the technical side, the only connection option offered is Apple Lightning connector. There is also a companion iOS app, however so far I was only using this headset with Android devices and laptops. This becomes possible using Anker's Lightning-to-USB-C adapter which is a must have device if you happen to own any good Lightning headsets and plan to connect them to other devices besides your iPhone. Anker's connector tech specs explicitly lists the Ambeo headset as a compatible device. As a side note, the adaptor also works great with Lightning cables by Audeze.

The controlling unit has a lot of buttons. Besides three usual media controls, there is also a rocking switch toggling between active noise cancelling, "normal" mode, and "transparent hearing"—when the device uses its built-in microphones to allow any external sounds in. This mode is useful because the headphones are designed for in-ear insertion and actually provide a good noise isolation even without active noise cancelling.

Another switch on the controlling unit activates "padding" for the stereo microphones. The designers intended it for use at concerts to avoid clipping during recording.

Speaking of the microphones, since this device was conceived for "3D" recording, besides the usual headset style mono microphone on the right earphone wire, it also has a microphone housed inside left and right earphone:

Before I bought this device I was thinking that the microphones are behind the grilles on the sides of the earphones, but actually the microphone is placed on the inner side of the earphone and faces the reflecting cavity of the pinna:

Overall, from a regular consumer's point of view, the appealing features of this headset are its noise cancelling function and the ability to create entertaining 3D "dummy head"-style recordings. However, the build of the earphones and bulkiness of the controlling unit (and probably relatively high price) most likely worked against its wide adoption.

Earphones

I didn't plan to actively use this headphone for listening to music, but it's still interesting to check what it is capable of. For comparison I'm using very well known and widespread Shure SE215 in-ear phones.

What you will immediately notice with the Ambeo headset is that it's very bright, up to the point when listening to vocal recordings with a bit of extra sibilance becomes unpleasant. My usual tracks for checking this are "Little Wing" performed by Valerie Joyce on "New York Blue" album, and Madonna's "Hang Up" from "Confessions on a Dance Floor".

On the other hand, this brightness also provides a very strong sense of spatiality that can be heard on Hol Baumann's "Endless Park" theme from "Human" album which sounds much duller and more two-dimensional on SE215.

I don't have a rig for measuring headphones, however I was able to capture reliably the high-frequency part of the transfer function of both Ambeo and SE215 by moving them in a free air close to a measurement microphone (a variant of MMA averaging)—the measurements are only valid starting from about 2 kHz. Then I simply divided these transfer functions and found this huge bump around 9 kHz on Ambeo:

To validate my finding, I used an equalizer first to add more high-end to SE215 and then to reduce the harshness of Ambeo, and it worked. The setting of the high-end equalization on Ambeo is extreme. The right setting seems to be somewhere in the middle between Ambeo and SE215—to add a wide peak of +6 dB Q 0.7 centered at 9 kHz to playback via SE215, and to apply a good dip when playing via Ambeo.

The difference in 1–5 kHz region can also be seen and it results in a more "distanced" perception of vocals. I tried adding a -2.5 dB Q 0.7 filter centered at 2 kHz and this helped adding some "depth" to the sounding of SE215 trading for some loss of clarity. Looks like these two settings result in a more "ambient" perception of an audio program. I suppose the reason for this equalization on the Ambeo headset is due to intention to use it primarily for immersive audio playback—playing back the "3D" sound captured with its microphones.

As a side note, I also liked that I found this equalization curve for Shure SE215, which by default sounds more "closer" and two-dimensional. It works even better if crossfeed is added. This experiment has rekindled my interest in SE215.

One problem that I've found at least with my particular Ambeo headset is the mismatch of the earphones transfer function at high frequencies. First I thought that this was due to my bad measurements—I used a DIY coupler to simulate an ear canal, so positioning of the earphone wasn't super precise. But then I also tried the averaging measurement method mentioned above. With both methods, I was always able to match left and right speakers on other in-ear headphones, except for Ambeo which always yielding rather different curves for the left and right earphones (below is the MMA measurement):

So I came to a conclusion that it must be the headset's fault. However, I can't say that I can hear this mismatch clearly, (especially the one in high frequencies). Still, for a headset of this price which has built-in DSP processing leaving this fairly obvious (via measurements) mismatch between left and right channels seems strange to me.

Microphones

Since my primary intended use of this headset was for "dummy head"-style measurements, I was curious to see how well the left and right microphones are matched and how they are tuned. Note that when this headset is connected to a PC (or Mac), it offers both "mono" and "stereo" recording modes. My expectation was that the "mono" mode uses the headset microphone (located on the right earphone wire) which is intended for communications. However, it turned out that the "mono" mode simply uses the left earphone microphone only. So I'm not sure how to activate the headset mic—perhaps when this headset is connected to an iOS device directly, it uses some special mode not available via the Anker adapter. Not a big loss though.

After seeing the mismatch between the outputs of the left and right earphones I was worried whether left and right "3D" mics are suffering from the same issue. I validated them by placing as close as possible to each other in a fixture (not on my head) and measuring the same sound source. Turned out that the mics are actually matched quite well, and we can see very close measurements when coherence is good. On the picture below the measurements are blanked out when coherence is less than 85%:

The tuning of the mics seems to be for "diffuse field"—with a prominent bump at high frequencies. This is important to know as would I try to tune a sound system to a "flat" curve using these mics, this will result in an excessively bright sound. Here is the comparison of measuring the same sound source in the same conditions using a Beyerdynamic MM-1 microphone with "free field" (0 degrees) calibration:

We can see that microphones of Ambeo start sloping up after 2 kHz at approximately 2 dB/octave rate. I wouldn't be paying much attention to other differences as they are likely due to differences in the microphones placement.

The next validation was to see how the transfer function of the microphones differs when they are inserted into ears. Due to the microphone placement, the incoming sound is now transformed by reflections from the pinna and torso. Below is the graph comparing freestanding vs. in ear microphone placements for the same sound source:

As we can see, the main difference is the prominent dip at approximately 4.8 kHz. I'm not a big specialist on anatomy of human hearing, so I can't say what it is caused by exactly. I tried putting a sound absorbing material on my shoulder and this changed nothing, so I suppose this dip is caused by some interference within the pinna. The wavelength corresponding to 4.8 kHz is approx. 7 cm, so half and quarter wavelength fit ear size.

There is a 2–3 dB boost in the speech range (300 Hz to 4 kHz)—I suppose this is thanks to the design of the pinna. And also noticeable a significant loss in high frequencies starting from approximately 14 kHz. This can actually explain why I'm not hearing well the mismatch between the left and the right earphones.

The differences in low frequencies are most likely due to variations of placement of the freestanding vs. in-ear and need to be ignored.

While writing this post I've looked up other reviews of Ambeo headset and found that on iOS it's possible to record at 24/96. Unfortunately the Anker adapter only supports 24/48. However, that's enough for my applications.

Applications

Now let's consider a couple of applications for this headset.

Sound System "offline" Evaluation

It can be useful to capture the produced sound field of a sound system for evaluating it later, perhaps in a more comfortable setting. This is similar to the original function of this headset—capturing 3D sound fields for realistic playback recreating the original environment.

There are great notes by S. Linkwitz of how much our perceptual system can ignore the room and focus on the direct sound of the speakers. However, if we reproduce a binaural recording of the system in a room back using the same system, we immediately start noticing all the room contributions (see the paper "Room Reflections Misunderstood?", Section 5). This is a really interesting experiment to try with this headset.

Note that since Ambeo is a binaural headset, not a spherical stereo microphone, the pinnaes of the person making the recording inevitably color the sound. As we have seen in the section above, the filtering by the pinna is non-negligible. I found that it's best to play back these recordings either on Ambeo itself (no surprise here), or on IEMs with close to direct field equalization. Playing on over-ear headphones or via speakers will "apply" the pinnae filter once again.

"Dummy Head" or "Spherical Microphone" Measurements

This is what I was doing when tuning audio in the car. Since the "room" is very small, and the presence of a human body introduces a significant change in the acoustic environment, using in-ear microphones for left and right speakers alignment produced better results than use of a measurement microphone.

To reiterate, I was using Ambeo only for matching the sound arriving into the left ear from the left speaker to the sound arriving into the right ear from the right speaker by equalizing the speakers. The final tonal adjustment was done using MMA averaging and double-checking with known music tracks. As we saw from the measurement of Ambeo's stereo microphones are well matched and are equalized for diffuse field. The dip around 4.8 kHz that occurs when they are inserted into ears (at least, my ears) must be ignored during sound sources matching.

A note of caution here. Ambeo headset is a digital device, not an analog microphone, and unlike pro audio interfaces it lacks external clock input. Since the audio output from Ambeo only goes into its earphones, one will need to use another digital audio interface for audio output. This is where the problem comes in—with two digital devices not synchronized via "world clock" feed there inevitably will be clock drift between them. To illustrate how bad the resulting measurements can be affected check the graph below:

The red trace is the original EQ filter (BTW, it's the SE215 "improvement" filter I was discussing in the Earphones section, with a bit of bass added), the magenta trace is the same filter as measured by Ambeo headset from a playback done via a separate audio interface. As we can see, there is a very serious spectral shift.

What to do about it? In REW the solution is to use the shortest test impulse (128k):

Using a shorter impulse has worse signal-to-noise ratio (there is more visible noise on the green trace) but at least there is almost no spectral shift. In fact, it's a well known problem with REW when it's used with USB microphones like miniDSP UMIK-1. I've seen several threads on forums where people were wondering why the results of their measurements using different log sweep lengths but otherwise the same setup didn't match. I'm really curious why REW allows for multi-device measurements by default.

The clock drift problem is the reason why Acourate only allows using a single device for input and output. With Acourate it's recommended to use even longer sweeps than REW uses, so attempts to "work around" single device limitation by using drivers like ASIO4All will inevitably lead to a severe spectral shift.

SMAART has a very useful feature for tracking the impulse response delay changes automatically. This is in fact the technique I used when aligning car speakers via Ambeo. I had to experiment with averaging settings to find the one that allowed for more reactive compensation of clock drift. Usually, the shorter the averaging is, the better.

Over-ear Headphones Equalization

Here is the full story of how I obtained the graphs above. I put on the Ambeo headset and then put Audeze EL-8 closed back over-ear headphones on top of it. Then I was playing test sweeps via EL-8 and measuring their output using Ambeo. Crazy, right? I don't think anyone at Sennheiser were considering this application of the Ambeo headset. However, as the last graph demonstrates, this setup can actually be used for measuring acoustically the effects of headphone equalization.
Does it mean this $200–$300 headset plus your own head can replace a head simulator for over-ear headphone measurements? Not quite. The trick with the measurement above was that I didn't move or replace the headphones while doing it, I simply was toggling equalization on and off. This allowed for quite reliable comparison of the measurements before and after equalization. What happens if I remove the headphones from the head, put them back again, and make another measurement? The measurement will be different. As people in the headphone industry know, in order to obtain a reliable measurement of headphones one needs to re-mount them several times and then average all the measurements taken.

This is how the derived EQ looks like when I actually re-installed EL-8 several times and used averaged measurements:

The results at high frequencies are not that reliable anymore, the tolerance is only within 2 dB, which is a lot for headphone measurements. This is what will happen if one will try to compare equalization of different over-ear headphones. So, Ambeo isn't a very precise tool for this task, at least for the whole operating frequency range.

However, Ambeo still provides a good reliable output for low frequencies. And in fact, it's the low frequencies where use of a head simulator is required because headphone drivers can only deliver their full bass output when there is a closed chamber between the driver and the ear drum. That brings an idea—we can use a combined measurement of MMA for high frequencies plus Ambeo for low frequencies.

As I've mentioned in the Earphones section, this is a variation of MMA where we slowly move the headphones near a microphone and wait for the RTA measurement with infinite averaging to stabilize. To demonstrate that the produced measurement can be reliable used, here is the EQ derived from this technique, I was holding EL-8 close to MM-1 and moving it slowly, waiting for 100 sampled measurements to accumulate:

As we can see, there is much better tolerance at high frequencies, but below 1 kHz the data is unreliable. And here is where Ambeo comes to the rescue. By merging together low frequency measurement done by Ambeo on a head with the rest of measurement obtained via MMA we can measure over-ear headphones output reliably.

A note of caution—this method is only good for comparing headphones. We measure one headset, then another, then derive the differences in their equalization. There is no way for measuring absolute frequency response of headphones using this method.

For a practical demonstration I measured filtering applied by Audeze Cipher cable for EL-8. Everyone heard the debates whether or not headphone cables make the sound different. Well, in the case of the Cipher cable vs. analog cable the difference is real because Cipher cable is digital and contains a DSP in it. I noticed that even when the EQ in Audeze app is set to 0 dB at all bands, the sound via Cipher still differs from the sound via analog cable. And I was able to measure this using the technique described above:

For the analog cable measurements I used SPL Phonitor Mini, which has very low output impedance and thus provides adequate bass output. The section of the graph below 1 kHz was obtained from comparing measurements done by the Ambeo headset on my head. There is noise because I turned off FTW gating in SMAART to get a full bass extension. However, we can clearly see that the Cipher cable boosts the bass by almost 3 dB (remember, this is with a "flat" EQ setting in the controlling app!). The section of the graph after 1 kHz was obtained with MMA technique. A "scoop" at middle frequencies can be seen clearly.

I found electrical measurements of the Cipher cable done by user KaiSc on Head-Fi.org. It confirms the 3 dB boost, but not the middle section scoop. Although KaiSc also mentions compression effects from the Cipher DSP at high volume. Since I was testing EL-8 at high volume to obtain adequate free-field output, it's possible that the DSP has thrown in some compression at this point. UPDATE: the "scoop" is a measurement error, see my post.