It was a long time ago since I started experimenting with a DSP setup for headphone playback, which achieves more realistic reproduction of regular stereo records originally intended for speakers. This is similar to what "stereo spatialization" does. Since then, I have been experimenting with various settings for my DIY spatializer with an aim to make it more immersive and natural, and have learned new things along the way.
In this post, I would like to present an updated version of the processing chain along with the discussion of the underlying approach. Since there is a lot of material to cover, I decided to split the post into two parts. In the first part, I talk about relevant research and outline the processing pipeline. In the second part, I will tell you about the process of individual tuning of the setup.
New Considerations
My initial understanding was that I needed to model a setup of stereo speakers in a room. However, after reading more works by S. Linkwitz about stereo recording and reproduction: "Stereo Recording & Rendering—101", and "Recording and Reproduction over Two Loudspeakers as Heard Live" (co-authored with D. Barringer): part 1, part 2, I realized that a good stereo recording captures enough spatial information of a real or an artificially engineered venue, and although it was mixed and mastered on speakers, and thus was considered for a speaker reproduction, speaker playback is not the only way to reproduce it correctly. In fact, reproduction over stereo speakers has its own well-known limitations and flaws. Moreover, if the speakers and the room are set up in a way which works around and minimizes the effect of these flaws, the speakers "disappear" and we hear the recorded venue, not the speakers and the room. Thus, I realized, if I take my initial intention to the limit and strive to model this ideal speaker setup on headphones, then I just need to work towards reproducing on headphones the recorded venue itself, since an ideal speakers-room setup is "transparent" and only serves as a medium for the reproduction.
Clean Center Image
So, what is the fundamental flaw of the speaker reproduction? As many audio engineers point out, there are various comb filtering patterns which occur as a result of summation of fully or partially correlated delayed outputs from the left and right speakers. The delay occurs because the signal from the opposite speaker arrives to the ear a bit later after the signal from the "direct" speaker. There is a very detailed paper by Timothy Bock and D. B. Keele "The Effects Of Interaural Crosstalk On Stereo Reproduction And Minimizing Interaural Crosstalk In Nearfield Monitoring By The Use Of A Physical Barrier" (in 2 parts: part 1, part 2), published in 1986. Their modeling and measurements demonstrate that comb filtering increases with correlation, thus the center image which is formed by fully correlated outputs is the most affected one. Floyd Toole also expresses his concerns about the change of the timbre of the center image caused by comb filtering in his seminal book on sound reproduction, see the Section 7.1.1.
The solution for crosstalk reduction used by Bock & Keele employed a physical barrier between the stereo speakers—remember, it was 1986 and high quality audio DSP was not nearly as affordable as it is these days. In fact, their solution was sort of a prototype for the family of DSP technologies which is now known as Ambiophonics. Whereas, Floyd Toole advocates for multi-speaker setups—the more speakers, the better—so that each source ideally gets its own speaker. This is where the mainstream "immersive audio" technology is heading.
With headphones, interaural crosstalk isn't a problem by design—especially for closed back over-ears and IEMs, and the phantom center image is reconstructed ideally by our brain using correlated signals from the left and right earphones. However, it is more difficult to match binaural signals that lack a sufficient degree of correlation. We need to help the brain by making signals more coherent. Although this can also create some comb filtering, it's well under our control.
Mid/Side Processing
My takeaway from these considerations and experiments is that the center channel should be left intact as much as possible. What is the "center channel" in a stereo recording?—It's the sum of the left and right channels. In the audio engineering world, this is known as the "Mid" component of the "Mid/Side" representation. Note that "Mid" is actually more than just the center. If we consider what happens when we add left and right channels together (L+R), we can observe the following results:
- fully correlated images sum and become twice as loud (+6 dB) over non-correlated ones;
- uncorrelated images—those that exist in the left or right channel only, still remain, but they are "softer" than the center image;
- reverse correlated (or anti-correlated) images—those that exist both in the left and the right channel but have their phases reversed, disappear.
The "Side" channel which is created by subtracting one channel from another (L-R) produces a complementing signal and contains anti-correlated and uncorrelated images, and fully anti-correlated images dominate.
Note that the M/S representation is a "lossless" alternative to the traditional L/R representation. The elegance of this pair of representations is that the same way as we get M/S from L/R by summing and subtracting the channels, we get the L/R back from the M/S using the same operations:
- M + S = (L + R) + (L - R) = 2L;
- M - S = (L + R) - (L - R) = 2R.
Thus, assuming that the processing is carefully designed to avoid clipping the signal due to doubling of the amplitude, we can convert back and forth between stereo and Mid/Side as many times as we need.
Thanks to their simplicity and usefulness, M/S encoding and decoding are built-in tools of every DAW. However, to simplify my processing chain, I prefer to use a dedicated plugin by Voxengo called MSED. The benefit of using MSED is that it can work "inline", which means it encodes stereo as M/S, processes it, and then converts back to stereo. The classical trick to make the stereo image wider in headphones is to increase the level of the side component compared to mid, see this paper for an example. We can also suppress the mid or side component entirely. This is how the stereo output looks like in this case:

We can see that the "Mid Only" output is essentially the mid component duplicated to both left and right channels, thus left and right channels become fully correlated, effectively this is what a "mono" signal is. While the "Side Only" output is still a "stereo" signal in which the left and right channels are reverse correlated.
By looking at the waveforms above, we can confirm that we get the original signal back by summing "Mid Only" and "Side Only" tracks together. Thus, it is possible to apply different processing to these parts and be sure that we preserve all the aural information from the source recording.
Stereo Reverb Of The Real Room
Even during my initial experiments, I understood that for increasing envelopment and spaciousness, a reverb must be used. What I didn't fully understand back then was that the more uncorrelated reverb impulses between left and right channels are, the better it works for listener envelopment. This idea was explored by Schroeder in his works on reverb synthesis by DSP (see the Section 3.4.4 in the "Applications of Digital Signal Processing to Audio and Acoustics" book). While correlated reverbs effectively create strong reflections—as if there were lots of hard surfaces around, and this sounds more like the ratcheting echo that we encounter in tunnels.
If you recall from my older post, initially I was using a synthesized reverb produced by the NX TrueVerb plugin. Later I switched to reverb that I extracted from the Fraunhofer MPEG-H authoring plugin. This reverb is used by the plugin for rendering objects in the binaural mode (for headphones). This reverb has more natural sounding and was seemingly recorded in some real room because after looking at its specter I could see signs of room modes. Impulses of its left and right channel were decorrelated enough—overall Inter-Channel Cross Correlation (ICCC), as reported by Acourate is less than 12%. However, while listening to reverb alone, I could still hear a slightly ratcheting echo—why is that?
I checked autocorrelation for each channel in Audacity and found that I can see lots hard reflections in them:

These reflections create comb filtering patterns that sound like the ratcheting effect. So I decided to try another reverb impulse—this time the actual reverb of my room, as it was measured using my stereo speakers. I had obtained these left and right channel impulses as a byproduct of tuning a desktop version of LX Mini speakers with Acourate—another project to write about some time later. In fact, this reverb impulse response had turned out to be much better, while the ICCC figure was just about 1% higher compared to the MPEG-H reverb. Take a look at the autocorrelations of channels:

So, in fact, it was my mistake that I was shunning away from using my room's actual reverb, considering it being "non-ideal." And thanks to the fact that headphones create a more controlled environment, I could adjust the direct-to-reverb ratio to be anything I want. As a result, I created a reverb environment which has reverb even lower than EBU requirements for a studio (EBU 3276), as follows from the analysis displayed by Acourate for a room of the same dimensions as my room:

Note that the level of reverb depends on the headphones used, and this particular graph is for the setting for open-back headphones (Shure SRH1840).
This is an improvement over my initial processing setup which was only compliant with more "relaxed" recommendations for reverb times for a "music presentations" room (DIN 18041, see the picture in the older post here).
The important thing about preparing the impulse response of the reverb is to cut out the first strong impulse of the signal, leaving only late reflections and the reverb "tail." In the processing chain, the "direct" signal comes from another track. By separating the direct signal from the reverb, it becomes much easier to adjust the ratio between their levels, and this becomes important once we try using different types of headphones, more about this in the upcoming part II.
The Effect Of Room Divergence On Externalization
Yet another finding has solidified my conclusion about the need of using a real room reverb. The paper "Creating Auditory Illusions with Binaural Technology" by Karlheinz Brandenburg et al., published in the collection of papers "The Technology of Binaural Understanding" edited by Jens Blauert and Jonas Braach describes an interesting experiment that explores the connection between the "inside the head" (ITL) localization and the room reverberation impulses used for binaural simulation. The study confirms that use of a reverb impulse which matches the room provides better externalization, while a divergence between visually predicted and aurally experienced reverb conditions incurs a confusion. This is commonly referred to as a "room divergence effect". Since it's a psychoacoustic effect, the exact outcome is somewhat complicated and depends on many parameters.
My layman understanding is that the divergence effect is especially pronounced when using open-back headphones, since they don't provide any isolation from external sounds. Thus, unless the room where you are listening to the headphones is completely isolated from the world outside, you still hear the sounds from the "real" world, processed with the real room acoustics. This forms an "expectation" to the auditory system of how external sounds should sound like. If the reverb used for headphone processing does not match this expectation, the brain gets confused, and it's more likely that the auditory image will collapse to ITL. Obviously, closed-backs and especially IEMs isolate better, and for them this effect might be less important for consideration. However, our eyes still see the room, and this can also create expectations about the reverb. Thus, using a real room reverb seems to improve chances for experiencing externalization in headphones, compared to using an "abstract" modeled reverb.
Application Of The Room Reverb
Recalling my original intention to leave the center sources intact, applying the reverb might look like a contradicting requirement. However, with Mid/Side processing it's possible to have both—the idea is that we apply a stronger version of the room reverb to the Side output, and a softer (more attenuated) version to the Mid output.
Since the Side Only output from MSED already contains uncorrelated and reverse correlated signals, "fuzzing" it even more with an uncorrelated stereo reverb does not hurt. In fact, it only makes it better—more spacious and lasting longer, giving the hearing system a better opportunity to analyze the signal. To help the brain even more, we also apply cross-feed to the result. Since cross-feeding is essentially a more sophisticated version of summing of left and right channels, it has a similar effect, that is, it amplifies correlated signals and suppresses reverse correlated signals. However, thanks to the fact that in cross-feed summing is weighted across the frequency spectrum, this effect is much weaker, the application of cross-feed does not produce a fully correlated output, and this is what we want.
When I listen to this "Side Only" reverb in headphones, the representation is fully externalized. When I stand in front of the speakers, it feels like I hear them playing. However, since I'm listening to anti- and uncorrelated parts, the audio image is "smeared" and serves only for the purpose of envelopment. For a better effect, the reverb used for the "Side Only" channel is massaged by a gentle Bessel low-pass filter with the corner frequency at 5 kHz. This simulates natural shadowing of signals that come from the back.
Leaving the center channel completely devoid of reverberation makes it sound in headphones too "dry" and too close. That's why in addition to the relatively strong room reverb applied to the Side Only output, I also apply much weaker and more delayed room reverb to the "Mid Only" component of the input signal. The idea is that this delayed reverb should be unnoticeable by our "conscious" part of the hearing apparatus, and only act as a spaciousness and distance hint to lower layers of brain processing. Thus, this extra reverb mostly relies on the precedence effect, complementing the direct sound and reinforcing it, while still being perceived as a part of it (a.k.a. "fusion").
Listening to this "Mid Only" reverb in headphones, I hear a "focused" sound of the speakers in the room. That's because the signal is formed from a "mono" signal. However, application of an uncorrelated stereo reverb "smears" it and adds some width. In order to find the desired delay and attenuation for the "Mid Only" reverb, I play a dry recording of some strong percussive instrument, like bongos, and increase the delay and reduce its level until I stop noticing the reverb. Yet, when I toggle the track with this extra reverb on and off, I can hear the change in the perceived distance to bongos. If the delay is increased too much, it "breaks" the precedence effect and the reverb turns into an echo.
Diffuse And Free Field Equalization
A lot of discussions are devoted to the topic of recommended headphone tuning. There are two cases representing the poles of the discussion. Günther Theile in his highly cited work "Equalization of studio monitor headphones" argues that the diffuse field (DF) equalization is the only correct way to tune the headphones, since this way the headphones do not "favor" any particular direction and thus provide the most neutral representation of the reproduced sound. A similar point of view is expressed by the founder of Etymotic, Mead Killion in his old blog post.
On the other side, there is the idea that the headphones must be tuned after the canonical 60 degree speaker setup, as measured in a free field (FF), or in an anechoic chamber. In practice, when listening to a "raw" (non-binauralized) stereo in headphones, none of these tunings work satisfactory for the general audience, and headphone makers usually settle up upon some compromise which keeps listeners engaged, based on an "expert opinion" or studies. One well-known example is, of course, the Harman target curve. There is also an interesting systematic approach for blending the curves of the free and diffuse field curves based on the room acoustics, proposed in the paper with a rather long title "Free Plus Diffuse Sound Field Target Earphone Response Derived From Classical Room Acoustics Theory" by Christopher J. Struck. The main idea is to find the frequency where the free field of the room turns into the diffuse field, and use that frequency as the "crossover" point for the DF and FF response curves.
Personally, I'm in the "diffuse field tuning" camp. This choice is rather logical if we aim for tonally neutral equipment. After all, we intend to apply any corrections in the digital domain and don't want to deal with undoing the "character" of the DAC, the amplifier, or the headphones that we use.
Returning to the paper by Brandenburg et al., another interesting finding which it points out is that the source directions for which achieving externalization in headphones is the most difficult are the full frontal and the full backward ones (0 and 180 degrees in the median plane). The hypothesis is that this happens due to the well-known "front-back confusion" from the Duplex theory. I decided to aid the brain to resolve this confusion by giving correlated sounds an "FF-like" frequency shape, and giving their counterparts—anti-correlated sounds a "DF-like" shape. In order to do that, I used the results of yet another paper, "Determination of noise immission from sound sources close to the ears" by D. Hammershøi and H. Møller. It provides averaged frequency shapes for FF and DF sound sources measured at various points of the ear: blocked ear canal, open ear canal, and the eardrum. Using the tabulated data from the paper, I could create "FF-to-DF" and "DF-to-FF" compensation curves. Below are the graphs of the "DF-to-FF" curves, marked with "BE", "OE", and "ED" for the measurement points listed above. The "FF-to-DF" curves can be obtained by inverting these graphs.
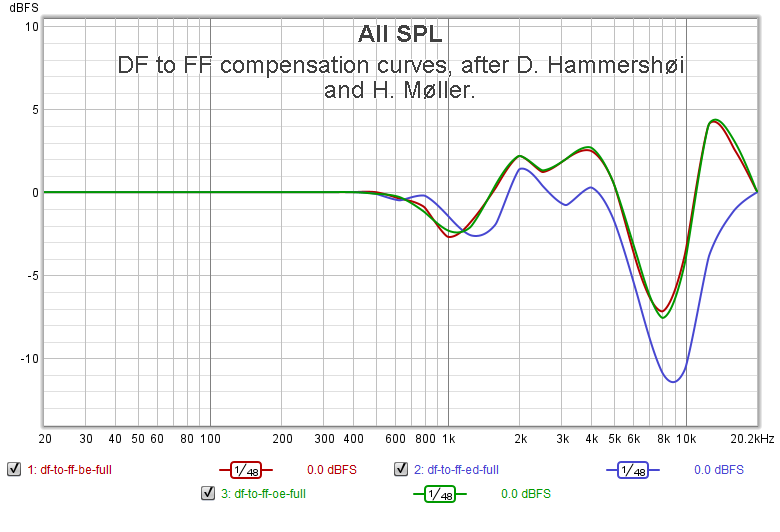
Since the paper uses averaged data, the curves are rather smooth except for the high frequency part starting at 6.3 kHz, which reflects the effect of the pinna filtering and the ear canal resonance. Thus, I decided to have two versions for each compensation curve: a complete one, and the one which only goes up to 5 kHz. When applying the "complete DF-to-FF at the eardrum" curve to the "Mid Only", component I could indeed make it sound more "frontal" (when using Shure SRH1840 headphones, at least). While applying the "low pass FF-to-DF at the eardrum" compensation to the "Side Only" component makes it more "enveloping."
The Effect of Adding Harmonic Distortion
Yet another surprising effect which I have discovered myself is how adding harmonic distortions affects apparent source width (ASW). By adding to the "Mid Only" reverb the 2nd harmonic, I could make it sound more "focused." While adding the 3rd harmonic to the "Side Only" reverb makes it even wider. Just to reiterate, the harmonics are only added to reverbs, not to the direct sound, thus the overall level of added harmonics is minimal.
Since I don't entirely understand the nature of this effect, I will try to find more information on its possible cause later.
The Goal of Spatialization
After going through all these lengthy explanations, you may be wondering what's the actual outcome of this? After all, there are commercially available spatializers, with no-hassle setup, with head tracking, etc. Are there any benefits besides learning more about how the human auditory system works? I've done some comparison with the spatialization available on the iOS platform, and I would claim that my DIY spatialization has higher quality. I compared the sounding of tracks which I use for tuning my setup via the iOS spatializer and mine, and I find mine to be more precise and more realistic, allowing to achieve a true state of "immersion."
It's an interesting experience which sort of comes and goes, and depends on the track and the headphones being used. After 12–15 minutes of listening, the brain gets accustomed to the reproduction and eventually starts "believing" that it actually hears the world created by the track. Headphones "disappear"—they feel no different from a hat—we "know" when wearing a hat that it's not the hat who creates the auditory world around us, and I do "know" in the "immersed" state that the surrounding sound does not originate from the headphones. The eyes start automatically following sound sources when they move, and I can really feel their presence. It's also super easy to turn my auditory attention focus from one object to another. It's really a sense of immersion, and it's similar to the feeling of "transparent reproduction" of music via speakers—sort of "audiophile nirvana."
So, yeah, for me it's more interesting to build my own setup and I believe that I can make it sound more natural than affordably priced commercial solutions. A similar thing is with speakers. Sure, there exist a lot of really good speakers, which may work fantastically out of the box, however some people, myself included, find it rewarding to build—if not design—their own.
Topology
OK, if you are still with me, let's take a look at the topology of the processing chain:

Let's go over the processing blocks of the chain. Note that the actual values for plugin parameters are only specified as an example. In the Part II of this post, I will go through the process of finding the suitable values for particular headphones and ears.
The "Input" block is just a convenience. Since my chain is "implemented" as a set of tracks in Reaper, having a dedicated input track makes it easier to switch the input source, try rendering a media file (via the master bus) in order to check for the absence of clipping, and apply attenuation if necessary.
The 3 processing blocks are wired in parallel, and in fact consist of the same set of plugins, just with different settings. The purpose of having the same set of plugins is to make time alignment easier. Although Reaper can compensate for the processing delay, sometimes this does not work right, and having the same set of plugins works more reliably.
The first processing block is for the "Direct" output. According to the principle of keeping the direct output as clean as possible, the only plugin which is engaged here is the cross-feed plugin 112dB RedLine Monitor which is set to the "classical" 60 deg speaker angle, no attenuation of the center, and emulation of distance turned off.
The "Side Reverb" block only processes the Side component, by toggling on the "Mid Mute" button on the Voxengo MSED plugin. As I mentioned above, the room reverb applied here was low-passed. The reverb is applied by MeldaProduction MConvolutionEZ. The cross-feed plugin uses a different setting than the "Direct" block—the center attenuation is set to the maximum, -3 dB and a slightly wider speaker angle: 70 deg is used. This is to avoid producing overly cross-correlated output. Then, also as explained above, the 3rd harmonic is added by using the Fielding DSP Reviver plugin.
The "Mid Reverb" block processes the Mid component only. It uses a whole version of the room reverb, with a higher delay. The cross-feed uses the same angle as the Direct output, for consistency, while the center attenuation is at -3 dB to produce more uncorrelated output. The Reviver plugin is set to add the 2nd harmonic.
The output from all 3 processing blocks is mixed together in different proportions. While the Direct output is left unattenuated, the reverb inputs are attenuated significantly. The actual values depend on the headphones used. Levels that are needed for open-back headphones are so low that the overall frequency response deviation from a flat line is within 1 dB.
The shaping of the signal that happens in the "Output" block is more significant. In fact, the whole purpose of the "Output" block is to adjust the output for the particular headphones. First, per-frequency left-right balance is corrected using the linear phase equalizer LP10 by DDMF—this is similar to the technique originally proposed by David Griesinger.
Then the Goodhertz Tone Control plugin is used to adjust the spectral tilt. The slopes are set to 0% both for bass and treble. This creates a very smooth tilt which practically does not affect the phase, and thus there is no need to switch the plugin into the "Linear Phase" mode. Note that although LP10 can also apply a spectral tilt, it's less flexible than what Tone Control can do. Finally, the MConvolutionEZ plugin, operating in "Mid" and "Side" modes, is used to apply "DF-to-FF" or "FF-to-DF" correction curves.
Obviously, linear phase plugins create significant latency, thus this setup is not intended for a "real-time" playback. However, using linear phase mode is worth it. I actually tried doing headphone balance adjustments using a regular minimum phase equalizer, and the result was much more "fuzzier." In fact, I can hear the same kind of "fuzziness" in the iOS spatializer running in "head tracking" mode. It seems that minimum phase equalization with narrowband filters causes a significant increase of ASW of sound sources.
What's Next
In the upcoming Part II of this post, I will provide steps on finding the right values to configure the processing components. These parameters are printed in italics on the processing chain scheme from the previous section.