Wednesday, June 29, 2022

Modular Audio Processing System, Part II

I have finished my last post about my audio system with a promise to tell about its digital part and the power supply. However, since that time I've already managed to do some changes to the analog part. The changes were caused by my intent to swap the KRK monitors for something that has less distortion. This has turned to be a project on its own—a conversion of a pair of LXmini speakers into a desktop version, and re-tuning them to have lower distortion. The conversion is a topic for some future post, while the topic of this post is about integrating the 4 channel QSC amplifier into the system and comparison of volume control circuits used by the amplifier and the RDL RU-VCA6A unit.

I use QSC SPA4-100 for driving speakers in LXmini. You might recall that LXmini uses "active crossover" approach and some DSP in order to turn a 4" midrange driver into a full range (albeit bass limited) dipole. One interesting aspect of the SPA line of amplifiers by QSC is that they have some "pro" features like the ability to drive 70V/100V long-range lines, and be remotely controlled. The remote control includes volume adjustment via a 10k variable resistor (pot). This appeared to be interesting to me because with this volume control I could bypass the need to use the RDL RU-VCA6A and connect the amplifier to the output of the sound card directly. It was still needed to retain the RDL control for the subwoofer though, thus the question was—is it possible to use the same gual ganged volume control pot both for RDL and QSC units, and will this work as expected.

The 10k Pot "Interface"

There is an unpublished standard for professional amplifiers and home installations to use a 10 kOhm linear taper potentiometer to control voltage. The conrol line uses 3 wires: ground, full scale DC voltage, and attenuated voltage. This naturally corresponds to the 3 posts of a variable resistor. DC voltage used by control circuits can be as high as 10 VDC, which is in fact what SPA4-100 uses, although the current is only 12 mA, whereas RU-VCA6A uses 5 VDC at 50 mA as a control signal,

You can often find potentiometer assemblies ready for in-wall or in-rack installation for ridiculous prices around $50. There is no real need to buy them, because there is absolutely nothing special in these potentiometers. They don't have to be linear—I use a logarithmic pot and even find it more convenient because I can quickly lower the volume and have a finer control at the "louder" end.

The input is thus a "standard." Yet, since it's not a real standard, manufacturers of amplifier and VCA units are free to choose how control voltage values map to gain or attenuation applied. Recall that VCA units typically have no gain on their own—a unity gain (0 dB or 1.0 multiplier), they can only attenuate the incoming line level signal. While in amplifiers with gain control there is a stage with fixed gain, for example 20 dB, and the gain control is implemented as a VCA feeding that stage. The maximum gain on amplifiers, which corresponds to unity gain on VCA units maps to the zero resistance position on the controlling pot—the maximum value of controlling voltage. This is where the agreement between manufacturers practically ends. What happens as you start turning down the controlling pot, thus increasing its resistance and decreasing the controlling voltage, purely depends on the intentions of the unit manufacturer. As I've learned, QSC and Radio Design Labs (RDL) see it in very different ways.

Volume Curves

In order to obtain a complete picture of SPA4-100 and RU-VCA6A behavior, I have traced gain changes corresponding to controlling voltage changes. The resulting function is known as a "volume curve." I used two multimeters by Agilent, both connected to a PC via a data logger. One multimeter logs the current resistance of the pot, the other logs the voltage of the audio output from the unit:
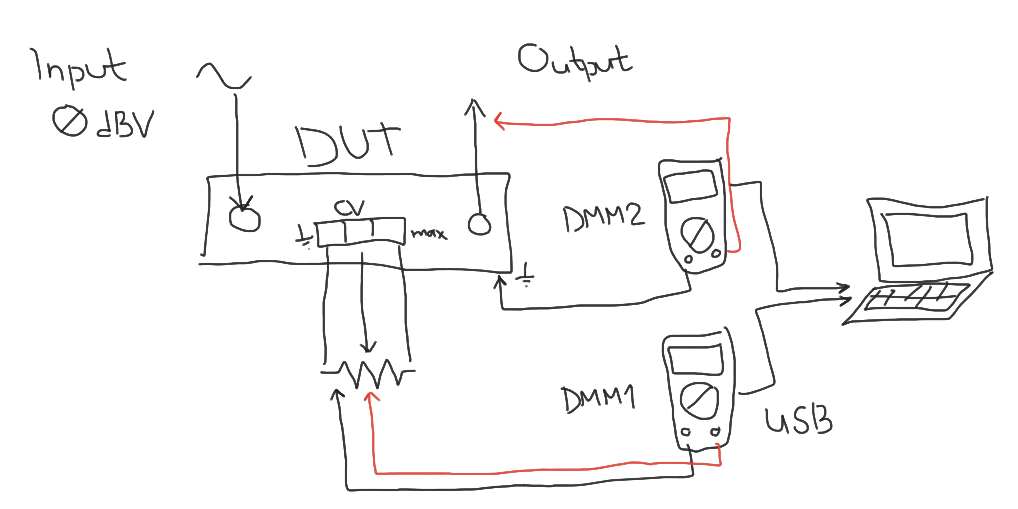
Agilent can display dBV levels by itself. Thus, by feeding the device under test with a sinewave at the reference level of 0 dBV, the reading of the multimeter on the output provides the device's gain directly. Then we can use log timestamps in order to establish correspondence between the controlling voltage and resulting gain. Note that because both the amplifier and the VCA unit accept balanced input, feeding them with unbalanced input—and that was what I did—decreases measured gain by half, that is by 6 dB. This is not relevant to the experiment because our intent is to measure both devices under the same conditions and compare their volume curves.

Using the approach above, I established that the amplifier goes from +24 dB down to -60 dB of gain, while the VCA unit goes from -6 dB down to -90 dB. Thus, the range of applied gains is actually similar, and is around 84 dB. However, the volume curves are totally different. In order to compare them, I've "normalized" the gain of the VCA unit, as if it were connected to a 30 dB fixed gain amplifier. Let's look at the shapes of the curves:

We can see that the volume of RU-VCA6A has a uniform slope (various bumps on it are likely due to imperfections in my measurement setup), whereas the volume curve of SPA4-100 has a linear region in the beginning up to about 2.5 kOhm resistance of the controlling pot, then it starts sloping, albeit slower than the curve of the VCA unit, and then at about 8 kOhm the amplifier basically drops the gain to the floor value of -60 dB.

Thus, it's not possible to achieve synchronous gain when using the same controlling pot for both devices. The fact that the VCA unit which controls the sub, lowers the gain at a faster pace than the amplifier for the main speakers leaves no hope to use nonlinearity of hearing—equal loudness curves—because they work exactly in the opposite way. And then I found yet another problem...

Noise and Distortion of the QSC VCA

As I started experimenting with the volume control on the QSC amplifier, I noticed that although the setup has practically no audible noise at the highest volume, the noise becomes audible as soon as I start turning the volume down. Normally, a power amplifier amplifies any noise fed to its input, and the higher the gain, the louder that noise will sound. The absence of noise at the highest volume proves that the noise from the DAC output is negligible low. Why does the noise starts appearing as we are making the gain lower?

I took some measurements of noise alone and of THD+N to demonstrate this phenomenon:

The blue FFT is taken at 2.5 kOhm, and the green FFT is at 3 kOhm of the controlling resistor value. The increase in noise and distortion is substantial and can be heard easily.

Now, looking at the volume curve of the amplifier, I've got the idea where does the noise comes from—it's from the amplifier's VCA unit which apparently has lower quality than the constant gain part. It seems that the VCA unit is bypassed when there is no attenuation. This explains the presence of the horizontal part on the volume curve. Once the volume control passes certain point, the VCA is engaged and the noise from it kicks in.

I guess, this was some sort of an engineering tradeoff. Understanding that not everyone really needs a volume control on a power amplifier, engineers at QSC provided a lower quality solution to save some money, however they were smart enough to get this lower quality VCA part out of the way on the critical path.

The Final Arrangement

Now for completeness, this is how my modular system looks after installing the QSC amplifier:

And this is the updated diagram of component connections:

Next time, I will finish this trilogy with a story about the digital part of the chain.

Saturday, March 26, 2022

Modular Audio Processing System, Part I

Recently I have completed assembling a system which I use for my casual audio playback needs and for audio experiments. I decided to reflect on the process of choosing and tuning the components of the system, also mentioning other options I was considering.

The goal of the system is to accept audio from various sources: files, mobile devices, web browsers, then process it to apply necessary room/speaker correction and binaural rendering, and then play on speakers and on headphones. There are of course numerous ready made commercial solutions for this, packing everything into one unit, however my intention was to have a truly modular system where each component can be replaced, and new functionality can be added if needed. Essentially, the system is built around a Mac computer with a pro soundcard. The challenging part was to figure out what additional equipment I need, and how to organize it physically, so that it does not just lay as a pile on the table, entangled by a web of cables.

For a long time already I stick to the "half rack" (9.5 inches) equipment form factor. I have a couple of racks and some audio equipment which either was designed for this format, or can be easily adapted to it. Here is how my current rack looks like:

Below is the schematics of connections between the blocks:

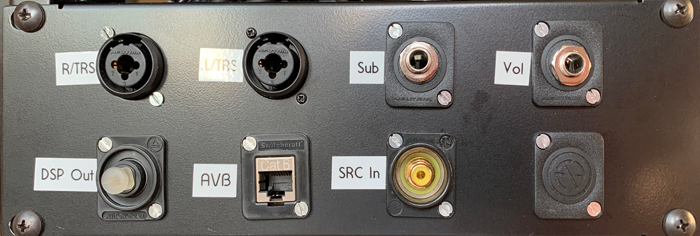
As I've mentioned before, the heart of the system is a Mac—an old model Mini from 2014, which I'm also using to type this post in. I've highlighted the inputs and the outputs of the system. Some of the input and output ports are mounted on the back panel:

All other interconnections are hidden inside the rack, and this makes the result to look nice if not "professional." Now let's consider the system component by component.

Mac Mini + MOTU UltraLite AVB

These two components essentially make a single unit equivalent to a dedicated DSP system, but in my opinion, more flexible. I wrote about the capabilities of UltraLite before: here and here. The features that I use for my needs are:

  • The routing matrix which is convenient for collecting various inputs: from applications, from external hardware, and via Ethernet. Note that I only use digital inputs on UltraLite in order to avoid adding noise.
  • AVB I/O is worth mentioning on its own as, I think, it's much more flexible than traditional point-to-point digital audio interfaces: SPDIF and USB.
  • DSP with some basic EQ functionality, as I wrote in the earlier post on the speaker system setup, it's enough for some basic corrections, however it is incapable of "serious" linear phase processing, which is done on Mac.

As for the functionality where UltraLite falls short, Reaper DAW running on Mac Mini helps to fill in the gaps. Here I can run linear phase FIR filters, linear phase equalizers, crossfeed and reverberation for headphones, and create arbitrary audio delays for synchronizing audio outputs. Note that although Mac Mini isn't a fanless computer, it stays perfectly quiet while running all this processing. Only sometimes does it briefly turn on the fan—this sounds like a loud exhale—and then keeps itself silent for awhile.

Having AVB input is nice as it allows using other computers for providing audio. Although Mac Mini runs Reaper alone with no glitches, launching a web browser inevitably introduces them—modern browsers are very heavy CPU-wise and perform a lot of disk I/O. That's why whenever I have to use a browser-based streaming client, I prefer to run it on a separate computer or a mobile device. The beauty of AVB is that, on Mac at least, one does not need to use any extra hardware audio interfaces, the only thing that is needed is a Thunderbolt to Ethernet dongle.

I also use UltraLite as a DAC—it has 8 line level outputs. Despite that interfaces by MOTU are considerably cheaper than functionally equivalent interfaces from RME, the quality of their analog outputs are on par, if not better. For example, below is a comparison of THD+N measurement for 0 dBFS 1 kHz tone, at +13 dBu of UltraLite's line out vs the line out of RME FireFace UCX (1st gen), both interfaces running at 48 kHz sampling rate, as measured by E-MU 0404 (this is to eliminate any possible bias when the card is measuring itself via an analog loopback):

Note on the output level—RME has selectable output level for its line outputs with the following modes: -10 dBV, +4 dBu, and Hi Gain (see the tech specs). From measurements, I've found the +4 dBu mode to be the "sweet spot": the signal level is high enough, yet distortions are lower than on Hi Gain. On MOTU Ultralite, the same output level is achieved by setting the output trim to -6 dB (that is, the level of full volume output on UltraLite is equivalent to Hi Gain mode on FireFace).

As we can see from the direct comparison, the output from MOTU is cleaner (this could also seen from comparing tech specs, but I wanted to double-check that, also MOTU specifies THD+N of output as low as -112 dB, I could not confirm that). Note that the 2nd generation of RME FireFace UCX declares better specs, but it's still much more expensive than MOTU. The huge benefit of the RME interface is its rock solid stability. With MOTU I'm occasionally running into the issue with emerging high-pitched signal dependent noise, fixing which requires rebooting the interface.

Lossless Wireless Output via Audreio

All the connections in my system use wires. However, sometimes it's nice to be able to drop the headphone wire, especially when I'm listening to music while doing things away from the computer. Surely, I did try a Bluetooth option, using a transmitter based on a Qualcomm chipset, which supports aptX HD codec—still lossy but sounding good nevertheless. However, it seems that BT transmitters, despite what their marketing materials say about the range of the connection, are mostly designed for the case when the listener sits in front of a TV. Once there is no straight line of sight between the TX and the RX, or when I move a bit further away, the connection switches to a lower bitrate, and finally degrades to the SBC codec which sounds noticeably lossy.

Because of this limitation of Bluetooth I decided to use WiFi. Its stations have more powerful transmitters and can turn up the power, even beaming the radio waves towards particular direction—do everything in order to keep a high bitrate connection with the receiver. I use my phone as an endpoint and run Audreio plugin inside Reaper on Mac to transmit audio to their app running in the phone. Since I'm not interested in low latency, I set the largest buffer size, and this works well with almost no dropouts as I'm moving around my house. Unfortunately, further development of Audreio has been canceled, however the last released app and plugin versions are stable and I haven't run into any issues while using them.

Naturally, with lossless audio delivered to the phone, it would be unwise to use wireless headphones. Instead, I usually use ER4SR by Etymotic, powered by a simple headphone DAC dongle by UGreen company, we will check its performance later.

Drop + THX AAA 789 Headphone Amp

I picked this amp because it has balanced line inputs and variable gain setting. I prefer balanced line inputs because there can be strong electro-magnetic fields inside the rack due to presence of power supplies. The Drop amplifier it is indeed very linear, thanks to the THX schematics.

Other options that I tried:

  • Built-in output on MOTU UltraLite. This one I only use for "debugging" or quick A/B comparisons. MOTU's output has relatively high output impedance, not as linear as Drop, and the volume control is not very comfortable.
  • Phonitor Mini. I used these for a long time and they were my reference for the crossfeed implementation. They also have balanced inputs and a dedicated mute switch, so you can leave the volume setting intact when you need a brief pause. However, both units that I had suddenly broke at some moment.
  • AMB M3 (my build). Due to its high power, this amplifier is also very linear under normal listening conditions, however it has two shortcomings: lack of balanced inputs, and high level of cross-talk between channels (not to be confused with crossfeed) due to it's "active ground" design. More about this in my old post.

I don't consider a headphone amplifier as the tool to make listening more "enjoyable." In my setup all psychoacoustic improvements are achieved by DSP processing. Thus, what is left to the headphone amp is to be as "transparent" as possible, and that means:

  • linearity and low noise,
  • close to zero output impedance, and
  • consistent left-right balance across the volume range.

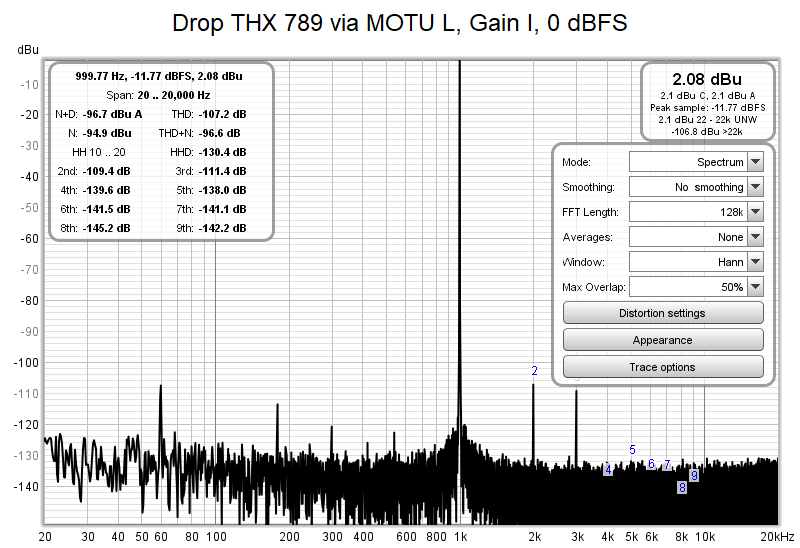
It's interesting to compare output from Drop's amplifier with the mobile DAC by UGreen into the same resistive 33 Ohm load. Drop is driven by the line out of MOTU. UGreen dongle is connected to an iPhone running Audreio app. The signal source is the same—REW. Volumes are set to provide the same output voltage of about 2 dBu: for UGreen this is maximum volume, Drop still has some room for increasing the volume, and the gain setting is I (minimal gain):

Unfortunately, there has been some mains noise during measurement which has degraded the calculated THD+N value. However, the THD figure is the same as we have seen on the MOTU's line out directly, this is very good.

It's clear that the dongle is struggling at this output level. Better THD (less harmonics) are seen when the output volume is reduced to about 3/4, however this lowers the signal-to-noise ratio. Still, I think for a $15 dongle the results are good. I was also impressed that the output impedance of the dongle is only 0.3 Ohms. I'm glad that the manufacturer follows good engineering practices.

RDL RU-RCA6A Multichannel Volume Control

With excellent hybrid analog-digital volume controls that modern audio interfaces offer, one could wonder is there still a need to use an external analog volume control. Well, sometimes there is. In my topology, only part of the outputs from UltraLite go to speakers, and there are more than two outputs that need to be controlled simultaneously. Surprisingly, doing this in a convenient manner is still a challenge! Usually volume controls in sound cards only work for stereo pairs of channels or for each individual channel. Even MOTU's excellent web interface these it no possibility to "bind" several channels into a group for volume control purposes.

That's why I decided to use an external volume control unit. Another valid use case to use it is when there is a need to build a multichannel output out of multiple stereo DAC units. "Multichannel" does not necessarily mean surround sound, it might be a stereo setup with line level "active" crossovers for the purpose of bi- or tri-amping.

Side note: these days there are plenty of "multi-room" playback systems offering time and volume level synchronization while playing over computer wireless or wired networks. It's an interesting option to explore, but keep in mind that most of those consumer network protocols, like AirPlay, are limited to CD audio quality (44 kHz / 16 bits). I will talk about AirPlay in the next part of this post.

My specific requirement to the unit was the form factor. It's easy to find a multichannel AV "prepro", like the Marantz unit I wrote about some time ago, however they are all made in the standard 19" "full rack width" format. Luckily, there exist "pro" equipment, but unfortunately it's typically quite expensive. Two "mid-price" pieces of equipment that I could find are: RCA6A by Radio Design Labs (RDL) and Volume8 by Sound Performance Lab (SPL—same company that makes Phonitors). I plan to do an in-depth comparison of these units some time later. For now, I can tell that Volume8 is all about the quality of the audio, while RCA6A was built with a focus on providing remote control options. The option which I chose to use with RCA6A is a simple 10 kOhm pot which I put in an enclosure:

Matte finish of the big black aluminum knob I found on Amazon pairs nicely with the plastic of the box.

What about the quality of RCA6A? Yes, for a purist in me, it could be better. Below is the output from the RCA6A at unity gain fed by UltraLite's line output at the same output volume setting I was using to make the THD+N measurement:

As we can see, RCA6A adds some non-negligible odd harmonics. Note that the level of the 2nd harmonic which originates from UltraLite remains the same, while the 3rd harmonic gets almost 13 dB higher. The level of noise goes up by 3 dB. However, because I still use inexpensive KRK Rokit monitors, I doubt that RCA6A is a "bottleneck" in terms of audio quality.

To be continued

As shown on the photo of the rack and the scheme, there are also a couple of digital audio units and the power supply. I will discuss them in the next post.

Saturday, December 18, 2021

YouTube Music and Intersample Peaks

A while ago I was checking how Google Play Music and the playback chain following it are handling intersample peaks. Since then, GPM was retired and replaced with YouTube Music (YTM), browsers got uncountable number of updates, and so on. Did the situation with digital headroom improve? I was stimulated to check this by the fact that I tried using YTM in Chrome browser on my Linux laptop, and was disappointed with the quality of the output. Before that, I was using YTM on other OSes, and it was sounding fine. Is there anything wrong with Linux? I decided to find out.

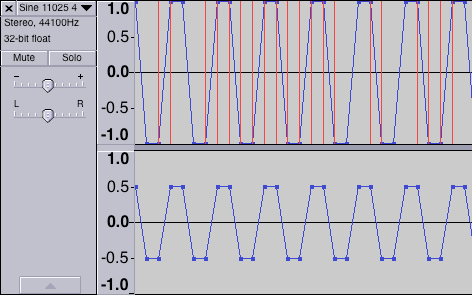
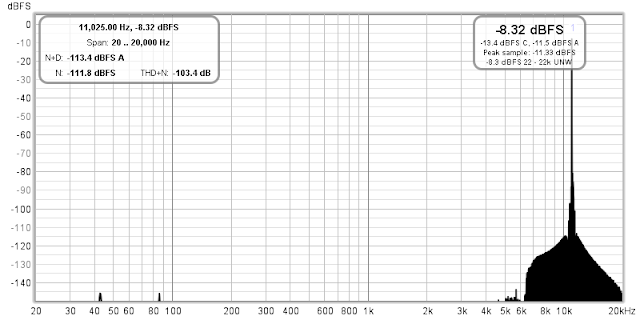
I have updated my set of test files. I took the same test signal I used back in 2017: a stereo file where both channels carry a sine at the quarter of the sampling rate (11025 or 12000 Hz), with a phase shift at 45 degrees. The left channel has this signal normalized to 0 dBFS, and this creates intersample overs peaking at about +3 dBFS, and the right channel has this signal at the half of the full scale (6 dB down), which provides enough headroom and should survive any transformations:

I have produced a set of test files to include all the combinations of the following attributes:

  • sample rate: 44.1 and 48 kHz;
  • bit width: 16 and 24;
  • dither: none and triangular.

There are two things that I can validate using these signals: non-linearities introduced by clipping or compression of intersample peaks, and whether the inter channel balance stays the same. For measuring non-linearities I used the THD+N measurement. Although, due to the fact that the signal is at the quarter of the sampling rate, even the second harmonic is out of frequency range, the "harmonic distortion" part of this measurement doesn't make much sense, however the "noise" part still does. There is a strong correlation between the look of the frequency response graph and the value of the THD+N.

I have uploaded my test signals to YouTube Music and then measured the THD+N in the following clients:

  • the official web client running in recent stable versions of Chrome and FireFox on Debian Linux, macOS, and Windows,
  • and the official mobile apps running on an Android phone (Pixel 5) and iPad Air.

All the outputs were measured using a digital capture chain. For macOS and Windows I used a hardware loopback on RME FireFace card. For Linux I used Douk Audio USB to S/P-DIF digital interface (Mini XMOS XU208) which was connected by optics to the FireFace card. For mobile devices I used a dual USB sound card iConnectAudio4 by iConnectivity. The sound cards were configured either at 44.1 or at 48 kHz.

Observations and Results

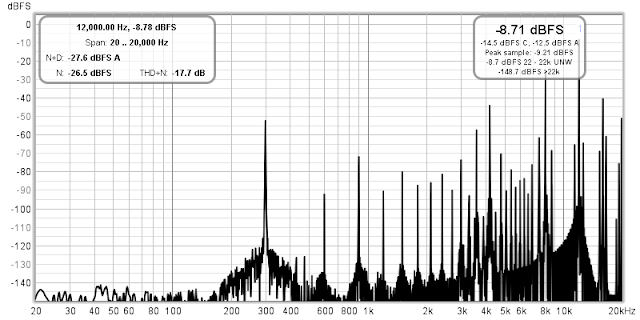
The first thing I've noted was that YouTube Music stores audio tracks at 44.1 kHz sample rate (this is confirmed by looking at the "Encoding Specifications" in the YT tech support pages), and 48 kHz files got mercilessly resampled, clipping the channel with overs quite severely. This can be easily seen by comparing the difference between the L&R channels of the signal played back—it's only 4.34 dB instead of 6 dB. Below is the spectrum of the 48 kHz test signal after it has went through YTM's server guts:

Also, it can be seen from the graph, YTM does some "loudness normalization" by scaling the amplitude of the track down, likely after resampling it to 44.1 kHz. This causes the peaks on both channels to be down by about 11 dB. Actually, that's good because it provides needed headroom for any sample rate conversions happening after the tracks leave the YTM client.

As for the lossy compression, it actually doesn't add much artifacts, as we can see from this example:

Yes, there is a "bulb" around the original signal likely added due to the fact that the codec works in the frequency domain and has reduced resolution. However, the THD+N of this signal is just 3 dB down (-103.4 dB) from the 16-bit dithered original (-106.8 dB), and it's still on par with capabilities of good analog electronics. So, lossy codec is not on the list of my concerns for the content on YTM.

Desktop Clients

On desktop, the difference in the measurements only depends on the browser. However, the trouble with Linux is that both Chrome and FireFox always switch the output to 48 kHz as they start playing even if the PulseAudio daemon is configured to use 44100 Hz for both the "default" and "alternative" sample rates. As we will see, this does a bad job for Chrome and likely was the reason why I felt initially that something is going wrong with YTM on Linux.

Yet another interesting observation on the desktop is that in case the browser does a bad job of resampling, bringing the digital volume control down on the YTM client does not provide any extra headroom for the browser's processing. That was a bummer! Apparently, the order of the processing blocks has changed, compared to Play Music, putting the digital attenuation after resampling, maybe because YTM uses some modern web audio API which gives the browser more control over media playback.

Here is a summary of THD+N measurements for Chrome and FireFox for cases when the system output is either at the "native" sampling rate—44.1 kHz or at 48 kHz. On the left there are baseline numbers for the original dithered signal, measures for the left and the right channel are delimited with a common slash:

Signal Chrome to 44 Chrome to 48 FireFox to 44 FireFox to 48
24/44, -146.7 / -139.2 -102.7 /-103.7 -29.6 / -82.6 -103.4 / -103.7 -103.3 / -103.5
16/44, -106.8 / -95.5 -102.9 / -97.8 -29.6 / -82.5 -102.1 / -97.8 -102.3 / -97.6
24/48, -147.5 / -139.7 -17.7 / -98.4 -17.7 / -80.6 -17.7 / -98.4 -17.7 / -98.4
16/48, -106.7 / -95.6 -17.7 / -89.4 -17.7 / -79.7 -17.7 / -89.5 -17.7 / -89.3

As we can see here, Chrome doesn't do a good job when it has to resample the output to 48 kHz, thus on Linux the only option is to use FireFox instead of it. And obviously, even FireFox can't undo the damage done to the original 48 kHz signal with intersample overs.

My guess would be that the audio path on FireFox uses floating point processing which creates necessary headroom, while Chrome still uses integer arithmetic.

Mobile Clients

Results from iOS are on par with FireFox confirming that this is likely the best result we can achieve with YTM. Android adds more noise:

Signal Android to 44 Android to 48 iOS to 44 iOS to 48
24/44, -146.7 / -139.2 -92.9 / -92.2 -92.9 / -92.2 -102.8 / -102.2 -102.8 / -102.2
16/44, -106.8 / -95.5 -92.6 / -88.3 -92.6 / -88 -101.8 / -97.7 -102 / -97.7
24/48, -147.5 / -139.7 -17.7 / -92 -17.7 / -92 -17.7 / -98.5 -17.7 / -98.5
16/48, -106.7 / -95.6 -17.7 / -87.9 -17.7 / -87.8 -17.7 / -89.4 -17.7 / -89.4

I had a chance to peek "under the hood" of Pixel 5 by looking at the debug dump of the audio service. What I could see there is that there are extra sample rate conversions happening on the way from the YTM app to the USB sound card. The app creates audio tracks with 44100 Hz sample rate. However, the USB audio on modern Android phones is managed by the same SoC audio DSP used for built-in audio devices, to bring down latency when using USB headsets. The DSP works at 48 kHz. Thus, even when the USB sound card is at 44.1, the audio tracks from YTM first got upsampled to 48 kHz to get to the DSP, and then DSP downsamples them back to 44.1 kHz for the sound card. I guess, on Apple devices either this pipeline is more streamlined, or everyone (including the DSP) use calculations providing enough headroom.

Conclusions

I think, it is all pretty clear, but here is the summary how to squeeze out the best quality from YouTube Music:

  • on desktop, when using Chrome (or Edge on Windows), set the sampling rate of the output to the native sample rate of YTM: 44.1 kHz, if that's not possible, use FireFox;
  • on Linux, always use FireFox instead of Chrome for running YTM client, because even lowering the digital volume on the YTM client does not prevent from clipping;
  • due to the fact that YTM applies volume normalization, there is no need to worry about having digital headroom on the DAC side;
  • any 48 kHz or higher content needs to be carefully resampled to 44.1 kHz before uploading to YTM to prevent damage from their sample rate conversion process.